2019
The Great Expedition

The Great Expedition is now open for all adventurers.
The Great Expedition has started. Since we have prepared this over a long period of time, we hope more and more adventurers will enjoy the content.
The Great Expedition is particularly meaningful to us for several reasons. Firstly, we didn't consider any ocean-related content expansion when we first started developing Black Desert, so developing the Great Expedition was a big challenge to us. Most importantly, our priority was to build a strong basis for the content expansion, which led us to undergo many trials and make the decision of "restart from the beginning" again and again. The delay of the update was regrettable and we are truly sorry for those adventurers who have been waiting for the Great Expedition.
However! What matters is that we are now able to happily introduce you the result of our work. "In the endless ocean..." These words bring us a sense of wonder, and we believe you will feel this sentiment as well. Now, the Great Expedition has begun. As we embark on this journey, we will continue to bring you more exciting experiences. Thank you so much for waiting for so long.
Many sailors have gathered at the taverns and Inns of Velia and Epheria to find a captain who would sail to the broad ocean. Islands in the ocean are full of Papu and Otter barterers who are competing with each other to barter with the adventurers. People who have tried to cross the ocean are now drifting the Margoria Sea and each of them has his/her own reasons to be in such a situation. Meanwhile, a strange current coming from the mysterious island, Oquilla's Eye, has caused bizarre sea creatures to drift to the innermost parts of Calpheon and Balenos and to threaten the citizens.
Barterers, NPCs drifting Margoria, and NPCs of Oquilla's Eye have been added and related Knowledges have been created.
You can now obtain knowledge when defeating the following.
*You can also obtain it from the hungry marine creatures and young sea monsters.
Hekaru
Ocean Stalker
Candidum
Nineshark
Black Rust
Goldmont Small Battleship
Goldmont Medium Battleship
Goldmont Large Battleship
The name of the area which appears when you enter an area of The Great Ocean has been changed like the following:
Before: Margoria
Now: The Great Ocean
Added the main quest "[The Great Expedition] Oquilla's Eye", in which Jarette Domongatt's mercenary unravels the mysteries of Oquilla's Eye.
You can immerse yourself into the mysteries of Oquilla's Eye by accepting the "Vigorous Velia" quest from the Black Spirit with a Lv. 50 or higher character.
Daily quests have been added for Oquilla's Eye.
* You can obtain Sailing EXP and materials for the new ships through the Oquilla's Eye daily quests.
* You can view the conditions for the following quests through the newly added "[Sailing Mastery] Sailing to the Ends of the Vast Ocean" tab from the Recurring tab of the Quests (O) window.
[Daily] We are the Owners of this Island!
[Daily] Precious Coral Piece
[Daily] For the Young Otter Merchants
[Daily] Ravikel's Test
[Daily] For the Serendian Soldiers
[Daily] Our Guild is not a Charity Group
[Daily] Do You Have What it Takes?
[Daily] Win-win Situation
[Daily] Old Moon Guild's Candidum Hunter
[Daily] Old Moon Guild's Nineshark Hunter
[Daily] Old Moon Guild's Black Rust Hunter
Upgrade Log quests have been added to the NPC Ravinia, who has revealed herself at Crow's Nest.
Ravinia's Ship Upgrade Log I
Ravinia's Ship Upgrade Log II
Ravinia's Ship Upgrade Log III
Ravinia's Ship Upgrade Log IV
Ravinia's Ship Upgrade Log V
Ravinia's Ship Upgrade Log VI
Ravinia's Ship Upgrade Log VII
You can accept these quests in order over 7 days and by completing each quest, you will receive a special letter from Ravinia each day. Open this special letter to randomly accept an interesting quest from Ravinia. Complete the quest and receive different rewards.
Bartali Sailboat has been added to the shop of Proix, the owner of the "Dancing Marlin" at Velia. Igor Bartali has decided not to provide the old Bartali Sailboat with his quest so that Proix's Sailboat could become a hit in the great ocean.
The quest "[Event] To Vell's Realm" is no longer acceptable.
New 7 Sailing daily quests have been added to the Dancing Marlin Tavern.
* You can check them from the newly added "[Sailing Mastery] Sailing to the Ends of the Vast Ocean" tab in the Quests (O) window.
* You can accept this quest from the Tavern Owner Proix and the Papu barterer Miya.
* Quest Requirement: Sailing Level of Beginner 2 or higher
Delivering Goods: Baremi Island
Delivering Goods: Narvo Island
Delivering Goods: Tinberra Island
Wanted: Hungry Sea Creatures
Wanted: Cox Scouts in Disguise
[Daily] For a Wider Trade Route
[Daily] How to Recover Sailors
[Barter]
Bartering has been added. It can be done through your ship in various locations of any island in the great ocean.
In order to focus on the enjoyment of the trade itself and to create an enjoyment that is not about making a profit by buying and selling the same product at different prices, we have come up with a very basic trading activity called "bartering."
At first, bartering was being designed to lead to a character growth in the ocean rather than to make land money. We've received comments from you saying that you wanted land and sea activities to be more intertwined with each other. So we gave a lot of thought to it and changed the design so that you could make your fortune in the land.
From now on, the goods from the land that haven't been actively traded through bartering so far, will gain a new value. Furthermore, when you get to the end of this content, you will be able to collect the new "Sea Coins." It's a coin issued by a mysterious organization of the darkness, a coin that promises wealth and honor to those who collect it. The man of the mysterious organization in question will soon reveal himself. At the Crow's Nest.

– You can enjoy bartering with any Papu or Otter barterer who has been sent to each island, or sailors who have drifted to Margoria. The exchange and loading will automatically take place if the necessary item(s) is in the ship.
(Please note that you cannot barter items in your character's Inventory)
– The following barters can happen in island nodes in the ocean.
|
Level 1 Trade |
Land materials -> Level 1 trade goods |
|
Level 2 Trade |
Level 1 trade goods -> Level 2 trade goods |
|
Level 3 Trade |
Level 2 trade goods -> Level 3 trade goods |
|
Level 4 Trade |
Level 3 trade goods -> Level 4 trade goods |
|
Level 5 Trade |
Level 4 trade goods -> Level 5 trade goods |
|
Level 6 Trade |
Level 5 trade goods -> Sea Coin |
|
Other Trades |
Trade goods -> New Ship materials and Enhancement materials |
– Some barters will offer you materials that are needed for upgrading the new ship or Equipment Enhancement materials.
– You can check the Sea Coins that you have obtained on the bottom of the weight bar in your Inventory.

Also, from Level 3 trade goods onwards, you can sell the goods and exchange them for Silver at the Shop. The higher the level of the trade goods is, the higher the price will be.
|
Level 1 trade goods (800LT) |
N/A |
|
Level 2 trade goods (800LT) |
N/A |
|
Level 3 trade goods (900LT) |
1 million Silver (Can be sold) |
|
Level 4 trade goods (1000LT) |
2 million Silver (Can be sold) |
|
Level 5 trade goods (1000LT) |
5 million Silver (Can be sold) |
– The Bartering item list will be reset daily in the morning, according to BDO time. You can do up to 100 barters every 4 hours. (A day in Black Desert world equals 4 hours in real time.)
– At first, bartering will be offered to you from only a small number of islands, but as you do more bartering, you will get offerings from more Papus and Otters, from many more islands.
The storage keepers from each territory became interested in bartering and started to buy trade goods.
* You can sell Lv. 3–5 trade goods at the existing shops. You can only sell Lv. 5 trade goods at the Currency Exchange.
– Level 3 trade goods
– Level 4 trade goods
– Level 5 trade goods
Use the Search Barter Information window on the right bottom of the World Map (M) to see the barter information at a glance.
When you click on a trade good from the Barter UI, the camera perspective will move to the location of the island.
[Special Barter]
As you proceed with bartering, you can be offered a special barter from the bartering NPCs of each island at a low chance.
Special Barters are barters which randomly occur by chance while using regular bartering. Though they do not happen often, you can exchange a very expensive item or a large number of Sea Coins through these Special Barters.
The more you barter, the more chance a Special Barter may occur.
You can get either Sea Coins or expensive goods you can't get from a regular barter by using the Gold Bars at a Special Barter.
You will see the items you can exchange through the Special Barter only when you have reached the relevant island.
The islands where Special Barters have happened will be displayed with a gold badge icon in the World Map (M)'s Barter Information UI.
You can see the information about the areas where Special Barters have happened in the Barter Information (the old Barter Search) window.
Whenever a Special Barter happens, a system message will be displayed.
You can select either Normal Barter or Special Barter from the Barter window.
The item information does not change every 4 hours for Special Barter.
If you do not exchange when Special Barter is available, the Special Barter will no longer appear.
[Sea Coin Shop]
A new shop where you can use the Sea Coins has been added.
Use this shop through , the Sea Coin Exchange Manager who can be found at the Crow's Nest island. Purchase items such as Khan's Concentrated Magic and other ocean-related goods.
Use this shop through , the Sea Coin Exchange Manager who can be found at the Crow's Nest island. Purchase the many ocean-related goods that are available.
Buy the Sea Coin Coupon, which can be purchased for 10 Sea Coins at the Sea Coin Shop. Use the coupon to do any of the following exchanges from , the Sea Coin Exchange Manager, for some items that can be bought with Silver.
Sea Coin Coupon x125 → Manos Necklace x1
Sea Coin Coupon x131 → Manos Earring x1
Sea Coin Coupon x120 → Manos Ring x1
Sea Coin Coupon x125 → Manos Belt x1
Sea Coin Coupon x2 → Manos Stone x1
[New Ship, Equipment and Function]
A new ship, Epheria Cog, has been added.

– Its default sailing speed is high, but Durability low, making it vulnerable to the sea monsters' attack.
– It can use the "BreezySail" skill by default.
– When its Lifespan ends, its sailing speed will decrease significantly and you won't be able to use the ship.
You can build the Epheria Cog in one of the following two ways.
|
Epheria Cog: Kalis-Certified |
||
|
Shipyard Level 2 |
Materials |
Acquisition |
|
Ship Upgrade Permit: Epheria Cog |
Purchase from Falasi for 7 million Silver |
|
|
Palm Plywood x50 |
Gathering, Processing |
|
|
Flax Fabric x60 |
Gathering, Processing |
|
|
Standardized Timber Square x25 |
Gathering, Processing |
|
|
Zinc Ingot x50 |
Gathering, Processing |
|
※ Find out more information about where to obtain the materials in Crafting Notes (F2).
|
Epheria Cog: Fallen Vell Pirates' Legacy |
||
|
Shipyard Level 2 |
Materials |
Acquisition |
|
Island Tree Coated Plywood x100 |
Exchange Level 2 sea trade goods for it |
|
|
Zinc Ingot x100 |
Exchange Level 2 sea trade goods for it |
|
|
Seaweed Stalk x1 |
Oquilla's Eye |
|
|
Tide-Dyed Standardized Timber Square x2 |
Defeat Sea Monsters |
|
You can build the Bartali Sailboat you can purchase from Proix of Dancing Marlin in Velia into an Epheria Sailboat or an Epheria Frigate by using the Upgrade System.
Interact with the Wharf Manager and select the ship you wish to upgrade.
Until now, you've always gathered your materials and let the worker take them and turn them into a ship. We are sure that when the release of new ships was announced, your expectation for the new ships excited you, but the burden to gather more materials and the possibility of losing the ship you had already built with so much effort worried you.
So we have added an upgrade system through which you can add materials to your existing ship and build a new one.

|
Epheria Sailboat Upgrade Method |
|
|
Ship Upgrade Permit: Epheria Sailboat x1 |
Falasi |
|
+10 Bartali Sailboat: Old Prow x1 |
Enhance after Purchase from Falasi |
|
+10 Bartali Sailboat: Old Plating x1 |
|
|
+10 Bartali Sailboat: Old Cannon x1 |
|
|
+10 Bartali Sailboat: Old Wind Sail x1 |
|
|
Standardized Timber Square x800 |
Gathering, Processing |
|
Steel x600 |
Gathering, Processing |
|
Pine Plywood x1500 |
Gathering, Processing |
|
Flax Fabric x300 |
Gathering, Processing |
|
Hard Pillar x100 |
Gathering, Processing,/p> |
|
Epheria Frigate Upgrade Method |
|
|
Ship Upgrade Permit: Epheria Frigate x1 |
Falasi |
|
+10 Bartali Sailboat: Old Prow x1 |
Enhance after Purchase from Falasi |
|
+10 Bartali Sailboat:Old Plating x1 |
|
|
+10 Bartali Sailboat: Old Cannon x1 |
|
|
+10 Bartali Sailboat: Old Wind Sail x1 |
|
|
Standardized Timber Square x1000 (Fixed) |
Gathering, Processing |
|
Jade Coral Ingot x800 |
Gathering, Processing |
|
Pine Coated Plywood x1000 |
Gathering, Processing |
|
Enhanced Flax Fabric x450 |
Gathering, Processing |
|
Hard Pillar x100 (Fixed) |
Gathering, Processing |
The necessary materials for upgrading a Bartali Sailboat to an Epheria Sailboat or an Epheria Frigate can be bought from Falasi and then be enhanced with Black Stone (Armor) or Concentrated Magical Black Stone (Armor).
Upgrade Methods that allow you to upgrade an Epheria Sailboat or an Epheria Frigate to their upgraded versions have been added.
|
Improved Epheria Sailboat Upgrade Method |
|
|
Epheria: Old Prow x1 |
Purchase from Falasi |
|
Epheria: Old Plating x1 |
|
|
Epheria: Old Cannon x1 |
|
|
Epheria: Old Wind Sail x1 |
|
|
Ultimate Armor Reform Stone x10 |
Processing |
|
Standardized Timber Square x250 |
Gathering, Processing |
|
Steel x200 |
Gathering, Processing |
|
Pine Plywood x500 |
Gathering, Processing |
|
Flax Fabric x100 |
Gathering, Processing |
|
Hard Pillar x30 |
Gathering, Processing |
|
Improved Epheria Frigate Upgrade Method |
|
|
Epheria: Old Prow x1 |
Purchase from Falasi |
|
Epheria: Old Plating x1 |
|
|
Epheria: Old Cannon x1 |
|
|
Epheria: Old Wind Sail x1 |
|
|
Ultimate Weapon Reform Stone x10 |
Processing |
|
Standardized Timber Square x250 |
Gathering, Processing |
|
Steel x200 |
Gathering, Processing |
|
Pine Plywood x500 |
Gathering, Processing |
|
Flax Fabric x100 |
Gathering, Processing |
|
Hard Pillar x30 |
Gathering, Processing |
※ The Improved Epheria Sailboat and the Improved Epheria Frigate basically have the same stats as the Epheria Sailboat and Epheria Frigate, but the formers can use the Volley skill.
※ The Improved Epheria Sailboat and the Improved Epheria Frigate, just like the Epheria Sailboat and Epheria Frigate, can be upgraded to Epheria Caravel or Epheria Galleass.
New ships, Epheria Caravel and Epheria Galleass, have been added.

– You can get an Epheria Caravel by upgrading an Epheria Sailboat. It has enough loading space (30 slots) and capacity (10,000LT), allowing the ship to be advantageous for trades and barters.
– You can get an Epheria Galleass by upgrading an Epheria Frigate. It has 4 Cannons on each side, making them 8 in total, which allows the ship to be advantageous for battles.
– Though you can't get on an Epheria Caravel's or an Epheria Galleass' cannons, you can fire the cannons while driving your ship.
– You can check in your existing ship to the Wharf Manager and then add materials to upgrade it to a more advanced ship.
|
Epheria Caravel Upgrade Method |
|
|
Ship Upgrade Permit: Epheria Caravel x1 |
Falasi |
|
+10 Epheria: Old Prow x1 |
Enhance after Purchase from Falasi |
|
+10 Epheria: Old Plating x1 |
|
|
+10 Epheria: Old Cannon x1 |
|
|
+10 Epheria: Old Wind Sail x1 |
|
|
Graphite Ingot for Upgrade x100 |
Defeat Sea Monsters, Processing |
|
Timber for Upgrade x100 |
Defeat Sea Monsters, Processing |
|
Adhesive for Upgrade x100 |
Defeat Sea Monsters, Processing |
|
Island Tree Coated Plywood x100 |
Exchange Level 2 sea trade goods for it |
|
Rock Salt Ingot x100 |
Exchange Level 2 sea trade goods for it |
|
Deep Sea Memory Filled Glue x4 |
Exchange Level 3 sea trade goods for it |
|
Seaweed Stalk x6 |
Oquilla's Eye |
|
Epheria Galleass Upgrade Method |
|
|
Ship Upgrade Permit: Epheria Galleass x1 |
Falasi |
|
+10 Epheria: Old Prow x1 |
Enhance after Purchase from Falasi |
|
+10 Epheria: Old Plating x1 |
|
|
+10 Epheria: Old Cannon x1 |
|
|
+10 Epheria: Old Wind Sail x1 |
|
|
Graphite Ingot for Upgrade x100 |
Defeat Sea Monsters, Processing |
|
Timber for Upgrade x100 |
Defeat Sea Monsters, Processing |
|
Adhesive for Upgrade x100 |
Defeat Sea Monsters, Processing |
|
Island Tree Coated Plywood x100 |
Exchange Level 2 sea trade goods for it |
|
Tide-Dyed Standardized Timber Square x6 |
Defeat Sea Monsters |
|
Cobalt Ingot x2 |
Exchange Level 2 sea trade goods for it |
|
Moon Scale Plywood x10 |
Defeat Khan, the |
※ The necessary materials for the upgrade can be forcefully enhanced from any Enhancement Level.
The "Verdant Black Stone," a material which can enhance the necessary materials for upgrading a ship to an Epheria Caravel or an Epheria Galleass, has been added.
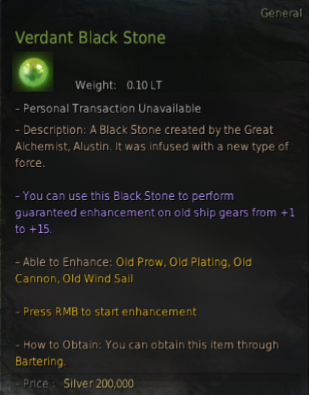
You can hand over the first trade goods to Ravinia’s sisters to receive the Crow Merchants Guild's Barter Voucher.
You can hand over the Crow Merchants Guild's Barter Voucher to Ravinia in exchange for the Verdant Black Stone.
Crow's Nest - Ravinia
Iliya Island - Revinia
Epheria - Ruvinia
Velia - Rovinia

Items that can be equipped to the new ships, Epheria Caravel and Epheria Galleass, have been added.
You can purchase the Green Grade equipment for Epheria Caravel and Epheria Galleass from Falasi.

– You can enhance the new ship equipment items with the following Black Stones available in Bartering or the Sea Coin shop.
|
Black Stone |
Enhancement Level |
|
Fiery Black Stone |
Level 0-5 Enhancement |
|
Frosted Black Stone |
Level 6-10 Enhancement |
– Different from regular ship items, the Enhancement level of new ship equipment items will not decrease even if the Enhancement fails.
|
Epheria Caravel: Black Dragon Prow |
||
|
Ship Part Workshop Level 4 |
Material |
How to Obtain |
|
Epheria Caravel: Brass Prow +10 |
Enhance after Purchase from Falasi |
|
|
Ruddy Manganese Nodule x50 |
Oquilla's Eye |
|
|
Enhanced Island Tree Coated Plywood x 300 |
Exchange Level 4 sea trade goods for it |
|
|
Seaweed Stalk x125 |
Oquilla's Eye |
|
|
Great Ocean Dark Iron x150 |
Exchange with Level 4 sea trade goods |
|
|
Epheria Caravel: Upgraded Plating |
||
|
Ship Part Workshop Level 4 |
Material |
How to Obtain |
|
Epheria Caravel: Upgraded Plating +10 |
Enhance after Purchase from Falasi |
|
|
Pure Pearl Crystal x45 |
Exchange with Level 3 sea trade goods |
|
|
Cox Pirates' Artifact (Parley Beginner) x60 |
Exchange with Level 2 sea trade goods |
|
|
Cox Pirates' Artifact (Combat) x60 |
Defeat Sea Monsters |
|
|
Moon Scale Plywood x200 |
Defeat Khan, the |
|
|
Epheria Caravel: Mayna Cannon |
||
|
Ship Part Workshop Level 4 |
Material |
How to Obtain |
|
Epheria Caravel: Verisha Cannon +10 |
Enhance after Purchase from Falasi |
|
|
Tide-Dyed Standardized Timber Square x180 |
Defeat Sea Monsters |
|
|
Cox Pirates' Artifact (Combat) x60 |
Defeat Sea Monsters |
|
|
Moon Scale Plywood x 200 |
Defeat Khan, the |
|
|
Bright Reef Piece x180 |
Exchange with Level 3 sea trade goods |
|
|
Epheria Caravel: Stratus Wind Sail |
||
|
Ship Part Workshop Level 4 |
Material |
How to Obtain |
|
Epheria Caravel: White Wind Sail +10 |
Oquilla's Eye |
|
|
Cox Pirates' Artifact (Parley Expert) x30 |
Exchange with Level 4 sea trade goods |
|
|
Seaweed Stalk x80 |
Oquilla's Eye |
|
|
Luminous Cobalt Ingot x30 |
Exchange with Level 4 sea trade goods |
|
|
Epheria Galleass: Black Dragon Prow |
||
|
Ship Part Workshop Level 4 |
Material |
How to Obtain |
|
Epheria Galleass: White Horn Prow +10 |
Enhance after Purchase from Falasi |
|
|
Ruddy Manganese Nodule x50 |
Oquilla's Eye |
|
|
Enhanced Island Tree Coated Plywood x 300 |
Exchange with Level 4 sea trade goods |
|
|
Seaweed Stalk x125 |
Oquilla's Eye |
|
|
Great Ocean Dark Iron x150 |
Exchange with Level 4 sea trade goods |
|
|
Epheria Galleass: Upgraded Plating |
||
|
Ship Part Workshop Level 4 |
Material |
How to Obtain |
|
Epheria Galleass: Upgraded Plating +10 |
Enhance after Purchase from Falasi |
|
|
Pure Pearl Crystal x45 |
Exchange with Level 3 sea trade goods |
|
|
Cox Pirates' Artifact (Parley Beginner) x60 |
Exchange with Level 2 sea trade goods |
|
|
Cox Pirates' Artifact (Combat) x125 |
Defeat Sea Monsters |
|
|
Moon Scale Plywood x300 |
Defeat Khan, the |
|
|
Epheria Galleass: Mayna Cannon |
||
|
Ship Part Workshop Level 4 |
Material |
How to Obtain |
|
Epheria Galleass: Verisha Cannon +10 |
Enhance after Purchase from Falasi |
|
|
Tide-Dyed Standardized Timber Square x180 |
Defeat Sea Monsters |
|
|
Cox Pirates' Artifact (Combat) x125 |
Defeat Sea Monsters |
|
|
Moon Scale Plywood x300 |
Defeat Khan, the |
|
|
Bright Reef Piece x180 |
Exchange with Level 3 sea trade goods |
|
|
Epheria Galleass: Stratus Wind Sail |
||
|
Ship Part Workshop Level 4 |
Material |
How to Obtain |
|
Epheria Galleass: White Wind Sail +10 |
Enhance after Purchase from Falasi |
|
|
Ruddy Manganese Nodule x50 |
Oquilla's Eye |
|
|
Cox Pirates' Artifact (Parley Expert) x30 |
Exchange with Level 4 sea trade goods |
|
|
Seaweed Stalk x125 |
Oquilla's Eye |
|
|
Luminous Cobalt Ingot x30 |
Exchange with Level 4 sea trade goods |
|
* Most of the materials needed for the upgrades above can be obtained through daily quests for [Sailing to the Ends of the Vast Ocean] recurring quests.
Added a new ship, Epheria Carrack, which can be upgraded from the Epheria Caravel and Epheria Galleass.

There are 4 different types of upgraded Epheria Carracks, and each have different characteristics.
|
Acquisition |
Epheria Carrack Type |
|
Epheria Carrack Type |
Epheria Carrack: Advance |
|
Epheria Carrack: Balance |
|
|
Upgraded from Epheria Galleass |
Epheria Carrack: Volante |
|
Epheria Carrack: Valor |
- The Advance and Balance Epheria Carracks are specialized for trading, due to their weight and space capacity (35 or more spaces inside the Inventory).
- The Volante and Valor Epheria Carracks are specialized for combat, due to their outstanding mobility and short cooldown for shooting cannons.
|
Epheria Carrack: Advance |
|
|
+10 Epheria Caravel: Black Dragon Prow x1 |
Created at the Ship Part Workshop |
|
+10 Epheria Caravel: Upgraded Plating x1 |
|
|
+10 Epheria Caravel: Mayna Cannon x1 |
|
|
+10 Epheria Caravel: Stratus Wind Sail x1 |
|
|
Moon Vein Flax Fabric x180 |
Defeat Khan, the |
|
Deep Tide-Dyed Standardized Timber Square x144 |
Defeat Sea Monsters |
|
Brilliant Rock Salt Ingot x35 |
Exchange Level 5 sea trade goods for it |
|
Tear of the Ocean x42 |
Oquilla's Eye |
|
Brilliant Pearl Shard x35 |
Exchange Level 5 sea trade goods for it |
|
Epheria Carrack: Balance |
|
|
+10 Epheria Caravel: Black Dragon Prow x1 |
Created at the Ship Part Workshop |
|
+10 Epheria Caravel: Upgraded Plating x1 |
|
|
+10 Epheria Caravel: Mayna Cannon x1 |
|
|
+10 Epheria Caravel: Stratus Wind Sail x1 |
|
|
Moon Vein Flax Fabric x180 |
Defeat Khan, the |
|
Deep Tide-Dyed Standardized Timber Square x144 |
Defeat Sea Monsters |
|
Brilliant Rock Salt Ingot x30 |
Exchange Level 5 sea trade goods for it |
|
Tear of the Ocean x50 |
Oquilla's Eye |
|
Brilliant Pearl Shard x30 |
Exchange Level 5 sea trade goods for it |
|
Epheria Carrack: Volante |
|
|
+10 Epheria Galleass: Black Dragon Prow x1 |
Created at the Ship Part Workshop |
|
+10 Epheria Galleass: Upgraded Plating x1 |
|
|
+10 Epheria Galleass: Mayna Cannon x1 |
|
|
+10 Epheria Galleass: Stratus Wind Sail x1 |
|
|
Moon Vein Flax Fabric x210 |
Defeat Khan, the |
|
Deep Tide-Dyed Standardized Timber Square x144 |
Defeat Sea Monsters |
|
Brilliant Rock Salt Ingot x30 |
Exchange Level 5 sea trade goods for it |
|
Tear of the Ocean x42 |
Oquilla's Eye |
|
Brilliant Pearl Shard x30 |
Exchange Level 5 sea trade goods for it |
|
Epheria Carrack: Valor |
|
|
+10 Epheria Galleass: Black Dragon Prow x1 |
Created at the Ship Part Workshop |
|
+10 Epheria Galleass: Upgraded Plating x1 |
|
|
+10 Epheria Galleass: Mayna Cannon x1 |
|
|
+10 Epheria Galleass: Stratus Wind Sail x1 |
|
|
Moon Vein Flax Fabric x180 |
Defeat Khan, the |
|
Deep Tide-Dyed Standardized Timber Square x170 |
Defeat Sea Monsters |
|
Brilliant Rock Salt Ingot x30 |
Exchange Level 5 sea trade goods for it |
|
Tear of the Ocean x42 |
Oquilla's Eye |
|
Brilliant Pearl Shard x30 |
Exchange Level 5 sea trade goods for it |
The new skill, "Volley", has been added to the new ships: Epheria Caravel, Epheria Galleass, and Epheria Carracks (Advance, Balance, Volante, Valor).
Volley is a skill which shoots out cannons from the left or right side of the ship by pressing the LMB or RMB while sailing on the ships. It can be used starting from Beginner Sailing Level 1.
The Volley skill has different cooldown times depending on the ship.
You cannot get off of a ship during the Volley skill's cooldown time.
You can prepare for departure by interacting with a wharf manager.
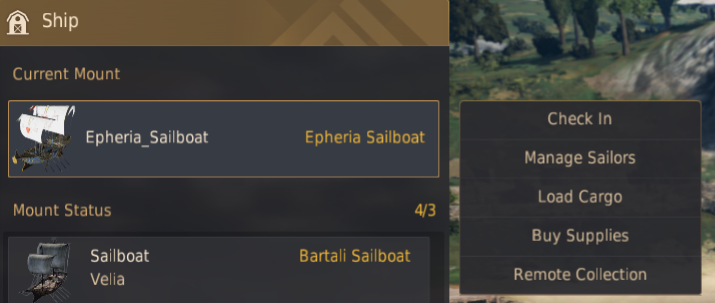
– Manage Sailors: You can prepare departure for hired sailors.
– Load Cargo: You can load items from the town storage or character inventory onto the ship.
– Supplies: You can receive Rations and Cannonball for Ship for the ship.
– Remote Collection: You can remotely collect a ship by paying a certain amount of Silver. However, you will receive penalties such as 10% increased damage to the ship and a penalty for sailors and cargo load when remotely collecting ships.
Added a feature which allows you to store cannonballs on the Galley, Epheria Sailboats, Epheria Frigates, and new large ships. Cannonballs will now fire even if you do not add any cannonball items to the large ships. After you take out your ship from the wharf, you must have rations and cannonball supplies in order to shoot the cannonballs.
Cannonball supplies cost 10,000 Silver per cannonball.You can sell the cannonballs to wharf manager NPC's at the price you purchased them.
※ However, each ship may have different cannonball capacities.
Due to the feature which allows cannonballs to be loaded on boats being added, the place where you can obtain the cannonballs has changed.
* You can sell the cannonballs and [Guild] Cannonball for Ship to wharf manager NPC's at the price you purchased them.
You cannot obtain Cannonball for Ship from wharf managers.
You cannot craft Cannonball for Ship from the Siege Weapon Workshop.
You cannot trade the Cannonball for Ship at the Central Market.
You don't have to veer your ship and escape whenever you find a terrible Ocean Stalker or a wicked Goldmont Pirate Ship anymore. Because our cute little cannoneer on stand-by will be waiting for his captain's firing command below deck!
But, when facing a giant monster such as Vell, the big cannon that's installed on the deck will still be more powerful.
Large Ships include the following ships.
Existing: Guild Galley, Epheria Sailboat, Epheria Frigate, Old Bartali Sailboat
New: Epheria Caravel, Epheria Galleass, Bartali Sailboat, Epheria Carrack: Advance, Epheria Carrack: Balance, Epheria Carrack: Volante, Epheria Carrack: Valor
A Reef Hazard Zone has been added to the coastlines of Velia and Port Epheria.
If you enter restricted areas around the shore, your ship will be damaged!
Due to the implementation of the restricted areas, all the ships which were near the restricted areas have been moved to nearest wharfs.
The damage system which only applied to Guild Ships has also been applied to the Epheria Sailboat, Epheria Frigate, and new large ships.
The ships will receive 10% damage (durability) each time they are destroyed. If their durability reaches 100%, you can no longer use the ships.
You can use the Restore Damage feature to repair damaged ships.
– Restoring ships cost Silver. (Epheria Sailboats and Epheria Frigates require 100,000 Silver per 10% damage restored.) Guild Galley requires 10,000,000 Silver per 10% damage restored, just like before.
※ However, the cost for restoring damage may vary depending on the ship.
While on a ship, an Anchor UI will be activated whenever you approach Papu, or Crio the Barterer around the islands of the Great Ocean.
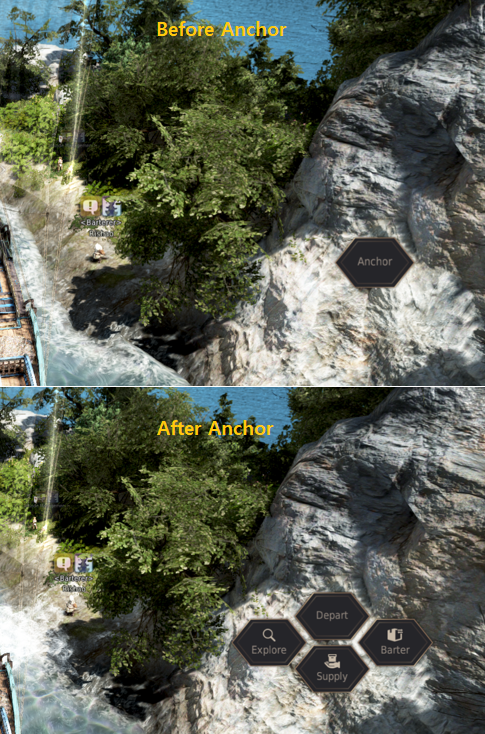
* You must be holding onto the steering wheel in order for the Anchor UI to appear.
Anchor: Activates features available on islands.
Explore/Supply: Sends sailor(s) to islands to explore or get supplies.
Barter: You can engage in a barter with a Barterer.
※ The ship will stop if you press the Anchor button. The ship will not move until you press the Depart button.
※ The Explore and Supply features are used to send sailors out for you. You must have 1 or more sailors on board the ship in order to use these features.
You can use the Explore or Supply feature in islands in the Great Ocean.
You can supply the Rations you have loaded on your ship with Supply and find treasures with Explore.
In order to Explore or Supply, you need to have at least 100,000 of Rations loaded on your ship.
So this is not possible if your Rations are equal to or less than 100,000.
– Once you begin Exploring or Supplying at any island, you can restart them only after 20 minutes.
Example: 20 minutes after you have begun Exploring, you can start Supplying.
Explore can sometimes start automatically while on sail.
*These actions occur when you have at least 1 sailor on board.*
Rations Increased / Decreased
Ship HP Increased / Decreased
Sailor Condition Recovered / Decreased
Item obtained / Quest received
※ Unlike Explore, Rations are not consumed.
Added the "Old Moon Guild's Relief Food" which allows you to supply emergency rations to the [Guild] Galley.
The Old Moon Guild's Relief Food can be purchased with Guild Funds of 40,000 Silver from Guild wharf managers. Galley ships will recover 10,000 rations per Relief Food.
only the Guild Master and Guild Officer can use the Old Moon Guild's Relief Food.
A feature has been added which allows you to fold up (reef) or shake out the ship's sail.
You can fold (reef) or shake out the sail by clicking on a button.
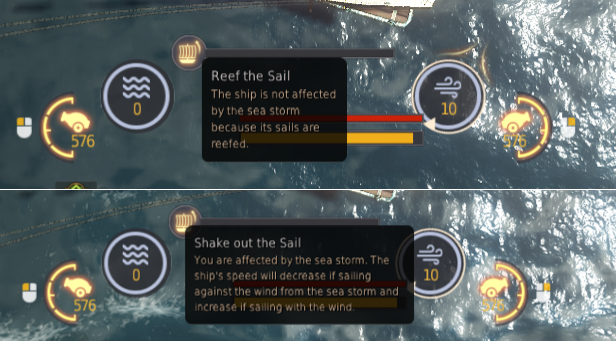
– When the sail is opened up, the ship is affected by the ocean winds. However, when the sail is folded up (reefed), the ship will not be affected by the ocean winds. Therefore you can sail more quickly by reefing or shaking out the sail depending on the ocean winds.
※ However, there is a cooldown of 5 seconds when reefing and shaking out the sail.
[Mount]
While on board a ship, the ship will no longer overlap with the wharf, land, and islands in certain situations like the below (You can no longer approach too close to the wharf, land, and islands):
When you go to the character selection screen while the character is on the steering wheel and the ship is near the wharf
When you are stuck on a land while moving or while using a certain skill
* The location of where the ship appears when taking out a ship from the wharf has been changed.
The Stamina conditions when using skills for the Galley, Epheria Sailboat, Epheria Frigate, and new large ships have been changed.
Character Stamina will recover during normal movement.
Stamina will be consumed when using PowerAccel, Ram, and BreezySail.
BreezySail can be used when you have maximum amount of Stamina while moving at top speed.
The AbruptTurn skill does not consume Stamina. Stamina recovers while you are using this skill.
If you recover maximum Stamina while using the AbruptTurn skill, you can use the BreezySail skill immediately after using the AbruptTurn skill.
The combined capacity of cargo load and sailor weight cannot exceed 100% on large ships.
However, it may exceed 100% through Bartering.
If it exceeds 100%, the ship will become slower, and you cannot use sailing skills.
You can now press the W key while using the AbruptTurn skill to immediately transition to normal movements.
The auto movements will be the same speed as normal movements for the Rowboat, Fishing Boat, Galley, Epheria Sailboat, Epheria Frigate, and Old Bartali Sailboat.
The AbruptTurn skill has been improved to look more natural for the Galley, Epheria Sailboat, and Epheria Frigate.
The camera perspective has been improved for normal movements, auto movements, and using skills for the Galley, Epheria Sailboat, and Epheria Frigate.
You can now use the AbruptTurn skill with the Galley, Epheria Sailboat, and Epheria Frigate even when you are not moving at top speed. You can also now immediately use the AbruptTurn skill while using the BreezySail and PowerAccel. skills.
The time it takes to stop by pressing the S button while moving has been reduced for the Galley, Epheria Sailboat, Epheria Frigate, and Old Bartali Sailboat.
You can now stop more quickly, and get off more quickly from the ship.
A smoke effect has been added for all large ships when the ship durability is at 50% or lower, and 10% or lower to show that the ship has been damaged.
Due to the Great Expedition update, all ships near Velia and Port Epheria have been moved to the wharfs.
Along with the introduction to the Great Expedition, all ships will now use rations. Rations have been supplied to adventurers who are far at sea, to help the adventurers not face too much difficulty.
Since ships no longer consume the cannonball items, the prices of selling cannonballs at the shops have been matched with the prices they are sold for at the shops.
The AP and DP information for the cannonball items have been revised to be more straightforward.
|
Before |
Now |
|
AP: 21–21 |
Extra Damage against Sea Monsters +500 x1 hit |
|
DP: 20–20 |
Hit Damage -1% |
The damage for cannon items which can be equipped on ships will now increase in greater increments depending on the enhancement levels.
The cannon damage applied in PvP has been changed.
※ However, the damage when used from the Old Bartali Sailboat, Galley, Epheria Sailboat, Epheria Frigate, and Bartali Sailboat remains the same.
– The chart below shows the comparison of damage between the large ships.
|
< Cannon Damage > |
||||||||||
|
Attacking Ship vs. Ship receiving damage |
Old Bartali Sailboat |
Galley |
Epheria Sailboat |
Epheria Frigate |
Bartali Sailboat |
Improved Epheria Sailboat |
Epheria Caravel |
Improved Epheria Frigate |
Epheria Galleass |
Epheria Carrack |
|
Old Bartali Sailboat |
- |
- |
- |
- |
- |
5% ↓ |
15% ↓ |
23% ↓ |
34% ↓ |
111% ↓ |
|
Galley |
- |
- |
- |
- |
- |
5% ↓ |
15% ↓ |
23% ↓ |
34% ↓ |
111% ↓ |
|
Epheria Sailboat |
- |
- |
- |
- |
- |
5% ↓ |
15% ↓ |
23% ↓ |
34% ↓ |
111% ↓ |
|
Epheria Frigate |
- |
- |
- |
- |
- |
5% ↓ |
15% ↓ |
23% ↓ |
34% ↓ |
111% ↓ |
|
Bartali Sailboat |
- |
- |
- |
- |
- |
5% ↓ |
15% ↓ |
23% ↓ |
34% ↓ |
111% ↓ |
|
Improved Epheria Sailboat |
5% ↑ |
5% ↑ |
5% ↑ |
5% ↑ |
5% ↑ |
- |
10% ↓ |
17% ↓ |
28% ↓ |
101% ↓ |
|
Epheria Caravel |
15% ↑ |
15% ↑ |
15% ↑ |
15% ↑ |
15% ↑ |
10% ↑ |
- |
7% ↓ |
17% ↓ |
83% ↓ |
|
Improved Epheria Frigate |
23% ↑ |
23% ↑ |
23% ↑ |
23% ↑ |
23% ↑ |
17% ↑ |
7% ↑ |
- |
9% ↓ |
71% ↓ |
|
Epheria Galleass |
34% ↑ |
34% ↑ |
34% ↑ |
34% ↑ |
34% ↑ |
28% ↑ |
17% ↑ |
9% ↑ |
- |
57% ↓ |
|
Epheria Carrack |
111% ↑ |
111% ↑ |
111% ↑ |
111% ↑ |
111% ↑ |
101% ↑ |
83% ↑ |
71% ↑ |
57% ↑ |
- |
|
< Ram Skill Damage > |
||||||||||
|
Attacking Ship vs. Ship receiving damage |
Old Bartali Sailboat |
Galley |
Epheria Sailboat |
Epheria Frigate |
Bartali Sailboat |
Improved Epheria Sailboat |
Epheria Caravel |
Improved Epheria Frigate |
Epheria Galleass |
Epheria Carrack |
|
Old Bartali Sailboat |
- |
- |
- |
- |
- |
5% ↓ |
15% ↓ |
10% ↓ |
20% ↓ |
30% ↓ |
|
Galley |
- |
- |
- |
- |
- |
5% ↓ |
15% ↓ |
10% ↓ |
20% ↓ |
30% ↓ |
|
Epheria Sailboat |
- |
- |
- |
- |
- |
5% ↓ |
15% ↓ |
10% ↓ |
20% ↓ |
30% ↓ |
|
Epheria Frigate |
- |
- |
- |
- |
- |
5% ↓ |
15% ↓ |
10% ↓ |
20% ↓ |
30% ↓ |
|
Bartali Sailboat |
- |
- |
- |
- |
- |
5% ↓ |
15% ↓ |
10% ↓ |
20% ↓ |
30% ↓ |
|
Improved Epheria Sailboat |
5% ↑ |
5% ↑ |
5% ↑ |
5% ↑ |
5% ↑ |
- |
9.5% ↓ |
4.7% ↓ |
14.3% ↓ |
23.8% ↓ |
|
Epheria Caravel |
15% ↑ |
15% ↑ |
15% ↑ |
15% ↑ |
15% ↑ |
9.5% ↑ |
- |
4.5% ↑ |
4.3% ↓ |
13% ↓ |
|
Improved Epheria Frigate |
10% ↑ |
10% ↑ |
10% ↑ |
10% ↑ |
10% ↑ |
4.7% ↑ |
4.5% ↓ |
- |
9% ↓ |
18% ↓ |
|
Epheria Galleass |
20% ↑ |
20% ↑ |
20% ↑ |
20% ↑ |
20% ↑ |
14.3% ↑ |
4.3% ↑ |
9% ↑ |
- |
8% ↓ |
|
Epheria Carrack |
30% ↑ |
30% ↑ |
30% ↑ |
30% ↑ |
30% ↑ |
23.8% ↑ |
13% ↑ |
18% ↑ |
8.3% ↑ |
- |
※ The Ram skill and cannonball damage are greatly affected by the Ship Equipment. You can feel the difference depending on what you have equipped.
The ship's HP will decrease by a certain amount when you attack using the Ram skill, depending on the amount of successful hits.
Durability will now decrease by 20,000 when using the Ram skill once, depending on the number of successful hits.
Ex) If you get 3 successful hits for using the Ram skill once, durability will decrease by 60,000.
Ram is a skill in which you deal damage to enemies by crashing against enemy ships. Now, durability will decrease only when you successfully hit an enemy ship.
Therefore you will not lose durability if you miss an enemy.
– You cannot shoot cannons while using the Ram skill with the Improved Epheria Sailboat, Improved Epheria Frigate, Epheria Caravel, Epheria Galleass, and Epheria Carrack. Also, in order to shoot cannons after using the Ram skill, you must wait for the cooldown.
You can now immediately load ships with trade items when purchasing the items from Traders.
– You can do this when your ship is within a certain range from the Trader you are interacting with.
The location where you interact with Fishing Boats has been moved to be near the ship's wheel.
Added a feature which allows you to bring ships which are far away from you.
You can bring a ship which is up to 40 units away by pressing the Wharf icon. When you press on the Wharf icon, you can board the ship immediately as long as the ship is within the distance from which you can board the ship.
You can only call ships from far away when your character is located on the surface of the sea.
When calling ships, the character will move to the steering area of the ship.
※ However, you cannot call a ship if the location to which you call the ship physically collides with it.
– The cooldown for this skill is 30 seconds.
You can use this even when other adventurers are on your ship. However, you must be careful since the adventurers on your ship will fall off from the ship.
Enhanced the convenience for the sailing skills for the Bartali Sailboat, Epheria Sailboat, Epheria Frigate, Epheria Caravel, and Epheria Galleass
You can now simultaneously use sailing skills and shoot cannons on the Epheria Caravel and Epheria Galleass.
Stamina will now immediately be consumed when using sailing skills.
You cannot use sailing skills when you do not have enough Stamina.
|
Sailing Skill |
Stamina Consumption |
|
Ram |
100 |
|
PowerAccel. |
650 |
|
BreezySail |
800 |
You can now use the BreezySail skill while auto moving on large ships.
You can now use the BreezySail by pressing the Shift key when you are at top auto movement speed while on board the Epheria Sailboat, Epheria Frigate, Improved Epheria Sailboat, Improved Epheria Frigate, Epheria Caravel, Epheria Galleass, and Epheria Carrack.
However, Stamina will recover more slowly when using auto movement rather than normal movement.
Trade items which are used for Barter can only be loaded through the Load Cargo feature from the wharf manager.
Barter items will be destroyed when large ships are destroyed or when remotely collected.
Just like before, items which can be equipped will not be destroyed, and there will be a chance that trade items will be destroyed just like in other mounts.
For large ships in which sailors can be boarded, there is a chance that they will no longer be able to board the ship due to damaged health conditions when large ships are either destroyed or when Remote Collection has been used.
When a sailor can no longer board the ship due to the sailor's status, their stats will not be applied. However, they can recover by using a specific item. (However, equippable items will not be destroyed.)
You can now press the S button while using the PowerAccel. and BreezySail skills on large ships to stop the skills.
[Hiring Sailors]
How to hire sailors
You can hire sailors who are located at Lunar Halo Inn in Velia, the coast of Port Epheria, and Iliya Island.
You need a "Sailor Contract Certificate" to hire sailors.
The Sailor Contract Certificate can be purchased from 3,000,000 Silver from "Philaberto Falasi" at Port Epheria, "Islin Bartali" at Velia Inn, and "Proix" at Dancing Marlin Tavern.
Items which recover the health of sailors have been added.
Chowder and Raisin Bread
"Chowder" can be obtained with Cooking Utensils at a Residence with the following ingredients: Dried Pearl Oyster Flesh x1, Pepper x2, Pork x2, Milk x1, Teff Bread x1
The Raisin Bread can be purchased from "Islin Bartali" at Velia, and from wharf managers.
Added an item which can be used to cure sailors.
Elixir of Regeneration
The "Elixir of Regeneration" can be obtained through Simply Alchemy with the following materials: Mandragora Essence x1, Essence of Magic Power x1, Oil of Regeneration x1, Troll Blood x2, Grape x4
Added an item which increases the slots of sailors.
Sailor's Oath
Added an "Emergency Ration Supply" system.
You can now supply rations to the ship using the food you have in your Inventory.
|
Food Grade |
Recovery |
|
White Grade |
80 |
|
Green Grade |
100 |
|
Blue Grade |
240 |
|
Yellow Grade |
4000 |
|
Orange Grade |
22000 |
Food items used to restore stamina of land workers and those that cannot be registered on the Central Market cannot be used for Emergency Ration Supply.
Added the Emergency Supply button to the Ration capacity status of the Ship Info window.
Mouse over Rations to view your current capacity.
Relief Ration of the Old Moon Guild (New Item)
Emergency Ration Supply is now available for the [Guild] Galley.
You can purchase this from the Guild Wharf Manager for 40,000 Silvers. Recovers 10,000 rations per item to your Galley.
※ Can only be used by Guild Masters and Guild Officers.
Emergency Cannonball Supply
Emergency Cannonball Supply can be done by using Breezy Crystal and Origin of Wind.
No. of Cannonballs Supplied
|
Breezy Crystal |
2 Cannonballs |
|
Origin of Wind |
8 Cannonballs |
|
[Guild] Breezy Crystal |
5 Cannonballs |
|
[Guild] Origin of Wind |
10 Cannonballs |
The withdraw authority for the above guild items was changed from Quartermaster or up to Guild Officer or up.
Existing items held by guild quartermasters can be deposited to the guild storage but not withdrawn again.
Emergency Cannonball Supply is only for [Guild] Galleys, not available for other ships.
Sailors receive EXP and grow from defeating sea monsters, regular and special barters.
EXP received is increased depending on the number of sailors on board your ship.
1 Sailor: 100% EXP
2–3 Sailors: 120% EXP
4–5 Sailors: 140% EXP
6–7 Sailors: 160% EXP
8–10 Sailors: 180% EXP
For example, you will receive 60% x 2 = 120% EXP if you have 2 sailors on board.
[New Island: Oquilla's Eye]
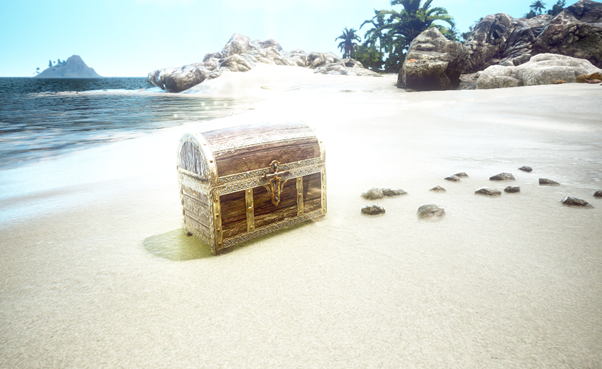
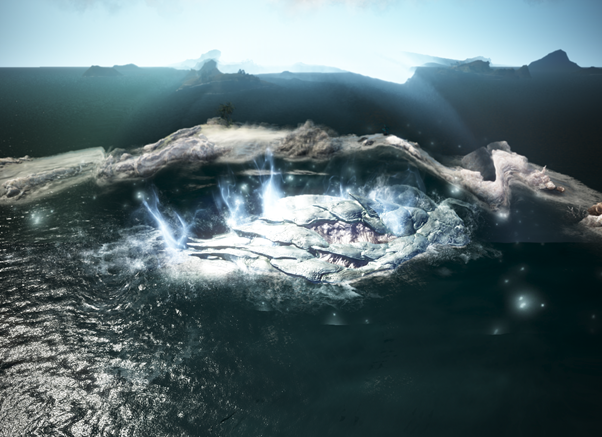
A strange natural phenomenon occurs at Oquilla's Eye every 3 hours. Many say they witnessed waterspout rising from the center of Oquilla's Eye, but no one knows why this happens. You could get seriously injured if you're in the water when this happens, due to the power of the rising water. This phenomenon at the center of Oquilla's Eye also spews up lost treasures from the depths of the ocean, so watch out for chests falling from the sky.
The message "Something strange is going on in the Eye of the Great Ocean." will be displayed every 3 hours. After a while, a waterspout will rise from the center of Oquilla's Eye. If your character is at this location when this happens, your character could die. There are no death penalties for dying from the waterspout.
A waterspout causes three large explosions.
Various types of treasure chest will fall after a waterspout, which you can open by using 1 Silver Key.
These treasure chests disappear after 1 minute.
You can receive the below items from the treasure chests.
|
Wooden Chest |
Chest Decorated with Bronze |
Chest Decorated with Silver |
Chest Decorated with Gold |
|
Tear of the Ocean |
Tear of the Ocean |
Tear of the Ocean |
Tear of the Ocean |
|
Ruddy Manganese Nodule |
Ruddy Manganese Nodule |
Seaweed Stalk |
Ruddy Manganese Nodule |
|
Lost Low Quality Lost Trade Goods |
Lost Medium Quality Trade Goods |
Ruddy Manganese Nodule |
Seaweed Stalk |
|
Ancient Gold Coin |
Lost Low Quality Lost Trade Goods |
Lost High Quality Trade Goods |
Lost High Quality Trade Goods |
|
Ancient Silver Coin |
Ancient Gold Coin |
Lost Medium Quality Trade Goods |
Lost Medium Quality Trade Goods |
|
Ancient Bronze Coin |
Ancient Silver Coin |
Lost Low Quality Lost Trade Goods |
|
|
Ancient Iron Coin |
Ancient Bronze Coin |
|
|
|
|
Ancient Iron Coin |
|
|
Otter Merchants of Oquilla's Eye will trade you rare items from the depths of the ocean for various items you can collect out at sea.
Otter Merchants make an appearance every hour.
You will receive the message "An Otter Merchant appeared nearby!" when he appears.
There is a chance for an Otter Merchant with better trade conditions to appear.
Exchange rate for item trades with the various Otter Merchants is as follows.
|
Name |
Item Required for Exchange |
No. |
Exchanged Item |
No |
|
Pucio |
Iridescent |
80 |
Seaweed Stalk |
1 |
|
Iridescent Coral |
120 |
Ruddy Manganese Nodule |
1 |
|
|
Iridescent Coral |
240 |
Tear of the Ocean |
1 |
|
|
Iridescent Coral Piece |
130 |
Iridescent Coral |
1 |
|
|
Hecio |
Iridescent Coral |
70 |
Seaweed Stalk |
1 |
|
Iridescent Coral |
110 |
Ruddy Manganese Nodule |
1 |
|
|
Iridescent Coral |
230 |
Tear of the Ocean |
1 |
|
|
Iridescent Coral Piece |
120 |
Iridescent Coral |
1 |
|
|
Ricio |
Iridescent Coral |
60 |
Seaweed Stalk |
1 |
|
Iridescent Coral |
100 |
Ruddy Manganese Nodule |
1 |
|
|
Iridescent Coral |
220 |
Tear of the Ocean |
1 |
|
|
Iridescent Coral Piece |
110 |
Iridescent Coral |
1 |
|
|
Churio |
Iridescent Coral |
50 |
Seaweed Stalk |
1 |
|
Iridescent Coral |
90 |
Ruddy Manganese Nodule |
1 |
|
|
Iridescent Coral |
210 |
Tear of the Ocean |
1 |
|
|
Iridescent Coral Piece |
100 |
Iridescent Coral |
1 |
|
|
Turio |
Iridescent Coral |
40 |
Seaweed Stalk |
1 |
|
Iridescent Coral |
80 |
Ruddy Manganese Nodule |
1 |
|
|
Iridescent Coral |
200 |
Tear of the Ocean |
1 |
|
|
Iridescent Coral Piece |
90 |
Iridescent Coral |
1 |
|
|
Bolio |
Iridescent Coral |
30 |
Seaweed Stalk |
1 |
|
Iridescent Coral |
70 |
Ruddy Manganese Nodule |
1 |
|
|
Iridescent Coral |
190 |
Tear of the Ocean |
1 |
|
|
Iridescent Coral Piece |
80 |
Iridescent Coral |
1 |
|
|
Girio
|
Iridescent Coral |
20 |
Seaweed Stalk |
1 |
|
Iridescent Coral |
60 |
Ruddy Manganese Nodule |
1 |
|
|
Iridescent Coral |
80 |
Tear of the Ocean |
1 |
|
|
Iridescent Coral Piece |
70 |
Iridescent Coral |
1 |
New gathering items were added.
Spotted Coral and Sea Fan were added.
You need to equip a Hoe to gather these items.
You can acquire Iridescent Coral and Iridescent Coral Pieces from gathering these items.
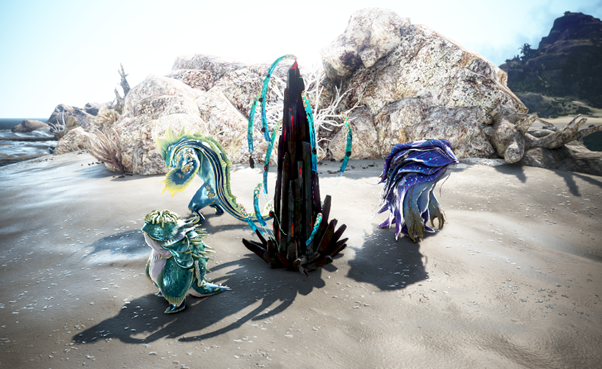
A new guild boss, Khan, the Eye of the Ocean, was added.
You can acquire Cerulean Wave Crystals by completing certain guild quest. Collect 10 and take them to Kanilla Delcas on Oquilla's Eye and exchange for Summon Scroll Pieces (You must first complete the quest from Kanilla Delcas to perform the exchange). You can acquire certain Summon Scroll Pieces by defeating the Cox Pirates' Ghost.
When you collect 9 Summon Scroll Pieces and place them in a certain shape, you acquire the "Incomplete Leanar's Celestial Map", with which you can exchange for the scrolls to summon Khan from Kanilla Delcas.
The Summon Scrolls you can acquire from Kanilla Delcas are as follows.
|
Incomplete Leanar's Celestial Map x1 |
[Guild] Leanar's Celestial Map: Extra Large x1 |
|
Incomplete Leanar's Celestial Map x1 |
[Guild] Leanar's Celestial Map: Large x1 |
|
Incomplete Leanar's Celestial Map x1 |
[Guild] Leanar's Celestial Map: Medium x1 |
|
Incomplete Leanar's Celestial Map x1 |
[Guild] Leanar's Celestial Map: Small x1 |
A guild master can summon Khan, the Eye of the Ocean by interacting with Oquilla's Eye. Only one boss can be summoned in a server and the cooldown for another summon is 1 hour. The summoned Khan, the Eye of the Ocean, will disappear after 30 minutes, regardless of the progress of battle.
You need [Guild] Monster Cannon Assembly Kit and [Guild] Monster Cannonball to defeat Khan, the Eye of the Ocean. You can acquire [Guild] Monster Cannon Assembly Kit and [Guild] Monster Cannonball from guild managers with the below items.
|
Old Moon Combat Seal |
[Guild] Monsterbane Cannon Assembly Kit x1 |
|
Old Moon Combat Seal |
[Guild] Monsterbane Cannonball x10 |
|
Old Moon Life Seal |
[Guild] Monsterbane Cannon Assembly Kit x1 |
|
Old Moon Life Seal |
[Guild] Monsterbane Cannonball x10 |
[Guild] Monster Cannon Assembly Kit and [Guild] Monster Cannonball are also available for purchase at the guild shop at 1,000,000 Silvers and 100,000 Silvers, respectively.
You can use [Guild] Monster Cannon Assembly Kit and [Guild] Monster Cannonball as below.
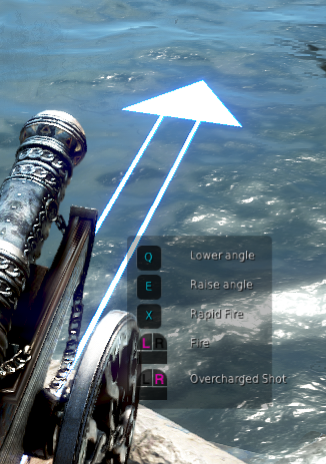
Damage various on the canon angle.
You can control the angle with Q and E.
Monster Cannon has 2 angle options (long and short distance), each having different features.
Short Distance Fire: Lower angle and shorter range. Has higher damage than long distance fire. Overcharged fire has 3 levels of damage increase.
Long Distance Fire: Longer range. Has lower damage than short distance fire. Overcharged fire has 2 levels of damage increase.
Cannonballs within the cannon will also be destroyed when the cannon is destroyed.
Unlike other cannons, this was made specifically to use on Khan, where you can add stacks on normal fire and use the stacks for either Overcharged Fire or Rapid Fire.
Normal Fire: Same as other existing cannons, except it has a shorter fire cooldown and gives stacks upon firing.

Overcharged Fire: Charge time and cooldown is longer than a normal cannon fire, but has higher damage. More stacks result in higher damage output.
| Stacks |
0 Stack |
1 Stack |
2 Stacks |
|
AP Compared to Normal Fire |
Approx. x3 |
Approx. x20 |
Approx. x30 |
|
Stacks |
0 Stacks |
1 Stacks |
2 Stacks |
3 Stacks |
|
|
AP Compared to Normal Fire |
Approx. x3 |
Approx. x20 |
Approx. x30 |
Approx. x50 |
|
Rapid Fire: Press X to enter Rapid Fire mode when you have stacks built up. Rapid Fire gives you faster reload speed and fire time. Using normal fire during Rapid Fire mode will give you stacks.
You get Rapid Fire shots from stacks as below.
|
Stacks |
0 Stack |
1 Stack |
2 Stacks |
3 Stacks |
4 Stacks |
|
No. of Rapid Fires |
N/A |
N/A |
3 Shots |
5 Shots |
10 Shots |
Khan, the
Please be careful when Khan is summoned as non-guild members can also be damaged from Khan's attacks.
Lightning begins to strike when you summon Khan.
Lightning is targeted to the player with the highest damage dealt to Khan.
You will receive damage when you step into the eye when Khan is summoned.
Khan summons Black Crystal Seaweed during the battle. Defeating Khan will become more difficult if you don't get rid of these.
Black Crystal Seaweed will continue to summon monsters until it is destroyed to distract you from Khan.
Destroying the Black Crystal Seaweed will also destroy the monsters it summoned. You can acquire the Black Crystal Cannon, which is more powerful than the Monster Cannon by destroying Black Crystal Seaweed.
Using the Black Crystal Cannon will make the battle a lot easier.
Khan prepares to heal itself once it loses a certain amount of HP.
To stop its healing, you can either destroy the Black Crystal Seaweed or hit it with enough Overcharged Fire shots.
Hide behind objects when you see the message that Khan is preparing a powerful attack.
There is no penalty for dying from Khan's attack and you will be able to revive in Oquilla's Eye via the "Resurrect at the closest Safe Zone" option if you've discovered the topography of Oquilla's Eye. ("Resurrect at the closest Town" will revive you in Port Ratt or the nearest town.)
When you successfully defeat Khan, swim out to the center of Oquilla's Eye to receive your loot.
You will be able to acquire items to upgrade your ships and valuable treasures of the Great Ocean.
Effect of Khan's Hearts
|
Khan's Heart: Destruction |
||
|
Equip Effect |
AP |
+1 |
|
Use Effect |
All AP |
+7 |
|
All Accuracy |
+ 9 |
|
|
Ignore All Resistance |
+4% |
|
|
Attack Speed |
+4% |
|
|
Casting Speed |
+4% |
|
|
Duration |
5 min |
|
|
Cooldown |
5 min |
|
|
|
Khan's Heart: Protection |
|
|
Equip Effect |
DP |
+1 |
|
Use Effect |
All Damage Reduction |
+7 |
|
All Evasion |
+9 |
|
|
All Resistance |
+4% |
|
|
Max HP |
+130 |
|
|
Duration |
5 min |
|
|
Cooldown |
5 min
|
|
|
Khan's Heart: Life |
||
|
Equip Effect |
All Life Skill Masteries |
+25 |
|
Use Effect |
Alchemy/Cooking Time |
- 1.3 sec |
|
Processing Success Rate |
+13% |
|
|
Weight Limit |
+70 |
|
|
Gathering/Fishing Speed |
+2 |
|
|
Gathering Item Drop Rate |
+12% |
|
|
Duration |
10 min |
|
|
Cooldown |
10 min |
|
[Monsters]
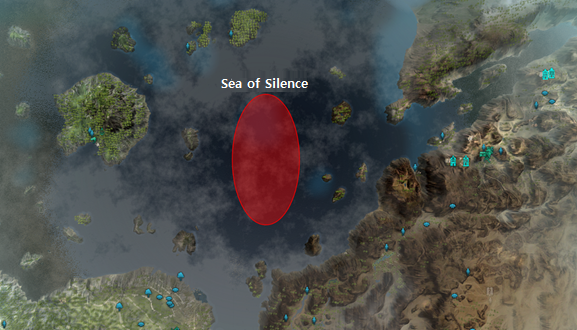
With the strange events happening at the Al Halam Sea near Orisha Island, the people of Altinova now whisper the area as the "Sea of Silence".
The sea monsters used to be concentrated to the Ross Sea and Marogria Sea areas. We have expanded the distribution of these sea monsters to the inland sea. They were relocated so that you can defeat the sea monsters in different areas of the sea depending on the type of ship you have. The monsters placed in these areas are monsters which will not initiate attacks first. This is to prevent the monsters from bothering adventurers who are simply catching seagulls or harpooning. The newly added Sea of Silence is a Monster Zone which replaces the previous Young Hekaru, and is more profitable than other sea monsters. We plan to continue to add more Monster Zones which will allow you to feel the growth of your ship.
There's a high chance the Phantom Ship will appear at the Sea of Silence. You will receive rewards you can sell to merchants in towns when you defeat the Phantom Ship The Phantom Ship receives higher damage from ships with exterior cannons, such as the Epheria Sailboat, Epheria Frigate, and Galley.
With the Great Expedition, the HP, AP, and reward of all oceanic monsters were updated. Also, the habitats of these monsters were changed as well.
Hungry Hekarus and Ocean Stalkers now dwell along the coasts of islands. They are not hostile, meaning they will not attack until provoked.
Young Hekarus and Young Ocean Stalkers roam the areas south of Padix Island and the wide northern area of Lema Island.
Hekarus and Ocean Stalkers lurk in the areas of the Ross Sea and Margoria Sea.
Once you go beyond Margoria, you will start to encounter Nineshark, Candidum, and Black Rust.
In between all the territories of monsters you will be greeted, with cannon fire of course, by the Goldmont Pirate Ships.
As you venture further out into the vast ocean, much powerful monsters await you, for which you will need to build stronger ships.
Defeating sea monsters give you Sea Monster's Neidans. Use Heating with 10 of these to craft the [Guild] Sea Monster's Neidan.
Sea monsters are responsible for sinking numerous ships venturing far out into the ocean for bartering. You can acquire barter items from sea monsters, which you can use to craft new ships and gear.
Defeating sea monsters gives you sailing and sailor EXP.
The Cursed Pirate Ship will appear from the Sea of Silence.
Added the summon scroll to summon the Cox Pirates' Ghost.
Cox Pirates' Shadow Ghost you encounter in various areas have a low chance to drop Summon Scroll Pieces.
Combine 5 Summon Scroll Pieces to craft a Summon Scroll.
The news of the grand opening of the Dancing Merlin tavern has reached the Cox Pirates and they have infiltrated into various islands waiting for a chance to plunder the place.
Look out for Cox Pirates Flags and the Drunk Sniper hiding somewhere in the barracks.
Rumor has it that many sailors witnessed some suspicious cargo ships floating around.
Destroying these will give you a low change to receive strange items. However, no one knows what these are, yet.
Destroying these cargo ships will decrease your Karma.
The Cox Pirates' Shadow Ghost has risen from the wrecks of their ships.
|
The Cox Pirates' Shadow Ghost will appear when they see you on your ship, but will not attack first. |
|
Once you commence the attack, your character on your ship will be its primary target. |
|
Once you defeat it, you will be able to summon its boss, the Cox Pirates' Ghost. Defeat the Cox Pirates' Ghost to acquire the summon scroll pieces specifically used to summon Khan, the Eye of the Ocean. ● According to the people of Oquilla's Eye, you can run into Lopters at the Ross Sea. Successfully defeat Lopters to receive an unknown item. You can use this unknown item to start a quest. |
[Ocean Current and Wind]
Ocean current and wind was added to affect sailing in all parts of the world of Black Desert.
They won't affect your ship as much when near the coastline, but will become a lot stronger as you venture further from the coast and out into the sea.
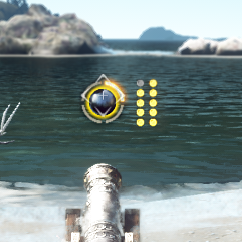
When you board your ship, you will be provided with information on the strength and direction of both ocean current and wind.
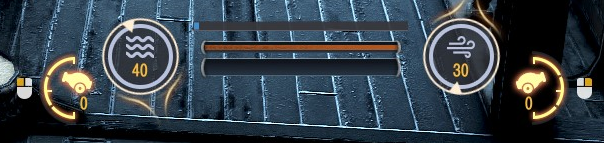
Also in this information UI, the top blue bar indicates the speed of the ship and the cannon icons on both sides show you information on cooldown and the number of cannonballs you have left.
Isn't it the dream of any great sailor to be able to wrestle the rough seas and arrive safely at his or her destination with their crew? Previously in the world of Black Desert, there were only the occasional whirlwinds nudging your ship and the abrupt Phantom Ship to inconvenience your travels.
All that is a thing of the past. Now, you will be faced with fierce winds as fearful as a giant's murderous grin, and unpredictable currents akin to that of wild horses. This new harsh environment could be of great nuisance to you, but many experienced sailors await to be hired to help you through the turmoils of the sea. We hope for you to embark on your very own journey out into the Great Ocean to adapt to and overcome everything it throws at you.