Treasures
Last Edited on : Apr 16, 2026, 15:57 (UTC)
Treasures in Black Desert are very difficult to acquire. However, their unique abilities make them very desirable for Adventurers who are looking for a challenge.
Treasures can be created by collecting the required materials in your inventory and rearranging them in the appropriate shape.
The materials needed have an extremely low drop rate, and it may even take months to completely gather just one of the materials.
Despite this, many Adventurers still seek them out throughout the world of Black Desert because of the treasures' amazing abilities.
Why don't we dive straight into these treasures and learn how to craft them?
Ornette's & Odore's Spirit Essences
It works in great combination with Fairy Laila's "Miraculous Cheer" ability that automatically consumes potions.
◈ How to Create Ornette's Spirit Essence

Ornette's Spirit Essence recovers your HP, and requires five different materials to craft it.
| Image | Material Item | How to Obtain |
 |
Sherekhan's Panacea |
Defeat monsters in Sherekhan Necropolis.
 (or exchange 100x Dragon's Fang with Merindora)
|
 |
Ash Halfmoon Kagtunak |
Defeat monsters in Blood Wolf Settlement.
 (or exchange 100x Blood Wolf's Oath with Merindora)
|
 |
Ron's Tintinnabulum |
Defeat monsters in Tooth Fairy's Forest.
 (or exchange 100x Tranquil Tinniolum with Merindora)
|
 |
Musical Spirit's Sound Stone |
 Exchange for x300 Peridot Leaf.
(NPC: Okiara River Node Manager Moyamo) |
 |
Gayak's Courage Stone |
 Exchange for x30 Garmoth's Scale.
(NPC: Sherekhan Necropolis Node Manager Camira) |
Gather all the materials listed above and place them in Yaz's Combinables Pouch (Inventory) in the appropriate shape seen below.

Arrange the materials in a [+] sign and press the + symbol to combine them and obtain Ornette's Spirit Essence.
Lesser versions of Ornette's Spirit Essence: Blessed Spirit Essence
With just one material from this treasure, you can create a lesser version until you acquire the rest of materials. Keep in mind that the lesser version will heal less HP than Ornette's Spirit Essence, but it is a good alternative until you achieve to obtain the treasure in its true form.
Follow this guide to create the lesser versions of Ornette's Spirit Essence:
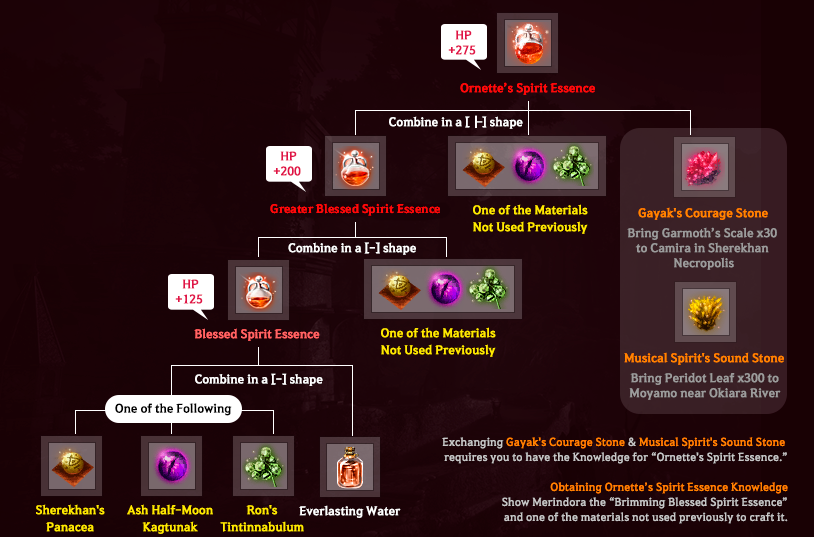
Important!
If you create another Blessed Spirit Essence by mistake after acquiring a second material, you can undo the crafting to recover the materials. Use Simple Alchemy with the Blessed Spirit Essence and you will recover all the materials used in the crafting.
With just one material from this treasure, you can create a lesser version until you acquire the rest of materials. Keep in mind that the lesser version will heal less HP than Ornette's Spirit Essence, but it is a good alternative until you achieve to obtain the treasure in its true form.


Follow this guide to create the lesser versions of Ornette's Spirit Essence:
Important!
If you create another Blessed Spirit Essence by mistake after acquiring a second material, you can undo the crafting to recover the materials. Use Simple Alchemy with the Blessed Spirit Essence and you will recover all the materials used in the crafting.
◈ How to Create Odore's Spirit Essence

Odore's Spirit Essence recovers your MP/WP/SP, and also requires five materials to craft it.
| Image | Material Item | How to Obtain |
 |
Narc's Crimson Tear |
Defeat monsters in Manshaum Forest.
 (or exchange 100x Narc's Solace with Merindora)
|
 |
Markthanan's Gland |
Defeat monsters in Tshira Ruins.
 (or exchange with 100x Katzvariak's Venom with Merindora)
|
 |
Valtarra's Clairvoyance |
Defeat Ferrica and Ferrina in Navarn Steppe and perform tanning on Ferrica and Ferrina after being defeated.
 (or exchange 100x Valtarra's Memory with Merindora)
|
 |
Night Crow's Dawn Stone |
 Exchange x100 Dragon Scale Fossil.
(NPC: Garmoth's Nest Node Manager Ominous Altar) |
 |
Krogdalo's Protection Stone |
 Exchange x100 Rumbling Earth Shard.
(NPC: Krogdalo's Trace Node Manager Krogdalo's Trace) |
Gather all the materials listed above and place them in Yaz's Combinables Pouch (Inventory) in the appropriate shape seen below.

Arrange the materials in a [+] sign and press the + symbol to combine them and obtain Odore's Spirit Essence.
Atanis' Element
In the case you obtain an item called Atanis' Element, you can exchange it for the so-called pity pieces at Merindora, in Grána. Once you have obtained 100 pity pieces of a type, you can craft the full material item needed for a potion. For example, using simple alchemy on x100 Blood Wolf's Oath and x1 Crimson Breath of Resentment (given by Merindora as well), you'll obtain x1 Ash Halfmoon Kagtunak.
In the case you obtain an item called Atanis' Element, you can exchange it for the so-called pity pieces at Merindora, in Grána. Once you have obtained 100 pity pieces of a type, you can craft the full material item needed for a potion. For example, using simple alchemy on x100 Blood Wolf's Oath and x1 Crimson Breath of Resentment (given by Merindora as well), you'll obtain x1 Ash Halfmoon Kagtunak.
◈ Pity Piece Weekly Quests
While trying to get one of the parts of the potions, you can complete a weekly quest to obtain x5 pity pieces of your choice:
• Valtarra's Memory
• Katzvariak's Venom
• Narc's Solace
• Tranquil Tinniolum
• Blood Wolf's Oath
• Dragon's Fang
You can complete all of these weekly quests per week and quests reset every Thursday at 00:00 (UTC).
| Quest | NPC | Requirement | Reward |
| [Weekly] Dragon's Fang | Camira | Defeat x1,000 monsters at Sherekhan Necropolis |
5x Dragon's Fang
|
| [Weekly] Tranquil Tinniolum | Navir | Defeat x1,000 monsters at Forest Ronaros |
5x Tranquil Tinniolum
|
| [Weekly] Blood Wolf's Oath | Rao | Defeat x1,500 monsters at Blood Wolf Settlement |
5x Blood Wolf's Oath
|
| [Weekly] Narc's Solace | Viverza | Defeat 1,000 monsters a Manshaum Forest |
5x Narc's Solace
|
| [Weekly] Katzvariak's Venom | Leon | Defeat 1,500 monsters at Tshira Ruins |
5x Katzvariak's Venom
|
| [Weekly] Valtarra's Memory | Enro | Defeat 250 monsters at Navarn Steppe |
5x Valtarra's Memory
|
Lafi Bedmountain's Upgraded Compass
In the world of Black Desert, Adventurers need to use a compass to find their exact location when they traverse the Great Desert of Valencia and the Great Ocean.Ordinary compasses are temporary, and disappear after a set amount of time, but Lafi Bedmountain's Upgraded Compass stays in your inventory permanently. Additionally, it has a special ability to summon other Adventurers to the bearer's position.

◈ How to Create Lafi Bedmountain's Upgraded Compass
You need a total of 6 different materials to create Lafi Bedmountain's Upgraded Compass.
Upgraded Compass Parts are core materials that share the same appearance when first obtained, but their true shape can be revealed when they are identified by NPC Ain Greid at the node Ancient Fissure, in Mediah. The appearance of each Upgraded Compass Part depends on the monster that dropped it.
The Lafi Bedmountain's Upgraded Compass requires all 3 different unique parts.
| Before Appraisal | After Appraisal | Item Name | How to Obtain |
 |
 |
(Before Appraisal) Upgraded Compass Parts
(After Appraisal) Lafi Bedmountain's Upgraded Compass Parts |
Defeat monsters in the Aakman Temple monster zone. |
 |
Defeat monsters in the Hystria Ruins monster zone. | ||
 |
3 gems are also required along with the Upgraded Compass Parts to craft the compass.
| Image | Item | How to Obtain |
 |
Blood Ruby | Processing, or purchase from the Central Market. |
 |
Ocean Sapphire | |
 |
Gold Topaz |
Once all the materials have been collected, arrange them in Yaz's Combinables Pouch (Inventory) as you see below to combine the gems with the compass parts.

Arrange the items in that shape to obtain Lafi Bedmountain's Upgraded Compass.
(Materials can be combined without appraising the compass parts as long as the correct compass parts are in their proper slot.)
Archaeologist's Map
There is a Traveler's Map in Black Desert that can teleport you to the nearest town.
It can teleport you across far distances, but you need to be careful when you use it if you are planning to return to your original position.
However, this treasure dubbed the Archaeologist's Map not only just teleports you to the nearest town, but also returns you to the position where you used it.

Like with Lafi Bedmountain's Upgraded Compass, the Archaeologist's Map will require you to obtain several parts and gems.
◈ How to Create Archaeologist's Map
You need 4 Archaeologist's Map Pieces and 4 gems to obtain the Archaeologist's Map.
Archaeologist's Map Pieces are core materials that share the same appearance when first obtained, but their true shape can be revealed by interacting with the Caphras Journal inside Caphras Cave, in Calpheon.
(4 different unique pieces of the map are required to create the Archaeologist's Map.)
| Before Appraisal | After Appraisal | Item Name | How to Obtain |
 |
 |
(Before Appraisal) Map of Unknown Piece
(After Appraisal) Archaeologist's Map Piece
|
Defeat monsters in the Roud Sulfur Mine monster zone. |
 |
|||
 |
Defeat monsters in the Pila Ku Jail monster zone. | ||
 |
You'll need to acquire 4 different kinds of gems along with the unique map pieces.
| Image | Item | How to Obtain |
|
Blood Ruby | Processing, or purchase from the Central Market. |
|
Ocean Sapphire | |
|
Gold Topaz | |
 |
Forest Emerald |

Arrange the materials in that shape to obtain the Archaeologist's Map.
(Materials can be combined without appraising the compass parts as long as the correct compass parts are in their proper slot.)
Ebenruth's Nol
Adventurers on their voyage to the waters are often surprised by how vast the ocean can be.
Ebenruth's Nol is a helpful treasure that can be equipped on an Epheria Carrack or a Panokseon to help you sail across the ocean separating the known lands from the Land of the Morning Light.
Equipping Ebenruth's Nol will allow you to use the sea mount skill Breezy Sail once more without consuming any stamina, and increases its movement distance by 50%.

◈ How to Create Ebenruth's Nol
Ebenruth's Nol requires Symbol-Engraved Nol and Ebenruth.
To obtain an Ebenruth, you need to obtain x1000 Oquilla's Flower and x1 Oquilla's Tear.
To create a Symbol-Engraved Nol, you must defeat ocean monsters called saltwater crocodiles to acquire an item called Moss-Covered Map.
Use the processing method of simple alchemy on the Moss-Covered Map with NPC Ravinia's Moss Remover to obtain one of the nine different Torn Treasure Map Piece items.
Collect all nine map pieces and combine them to obtain the Treasure Map of a Sailor item. Rumors say there is also an extremely low chance to obtain this treasure map by using simple alchemy on a Torn Treasure Map Piece.
 |
 |
 |
 |
 |
 |
 |
 |
 |
After acquiring the Treasure Map of a Sailor, proceed with a quest to obtain the Treasure Chest of a Sailor. Opening the box will give you a Symbol-Engraved Nol at a certain chance.
Ebenruth can be obtained by using simple alchemy on x1,000 Oquilla's Flower and x1 Oquilla's Tear. Oquilla's Flower can be acquired through barter, purchased from a Crow's Nest vendor, and from the Treasure Chest of a Sailor. Oquilla's Tear can be acquired only through purchase from a Crow's Nest vendor.
| Image | Item Name |
How to Obtain
|
||
 |
Symbol-Engraved Nol | Open Treasure Chest of a Sailor | ▶ |
 Ebenruth's Nol
|
 |
Ebenruth | Use Simple Alchemy on Oquilla's Flower x1000, Oquilla's Tear x1 | ||
Rich Merchant's Ring
This treasure increases the Central Market silver collection per sale by +5%, and unlike the Old Moon Trade Pass which is a one-use consumable item, the ring is permanent.
There are rumors that Adventurers are currently seeking the Rich Merchant's Ring by using the hints from the image below.

Krogdalo's Sanctuary
If you have successfully completed the Mythical Awakening for all three types of Dream Horses (Mythical Arduanatt, Mythical Dine, and Mythical Doom), you can check in and take out up to 5 horses of any kind, including Krogdalo, in your personal stable called Krogdalo's Sanctuary.
■ Krogdalo's Sanctuary can be moved from another character to your current character via a maid/butler.
◆ When using a maid/butler to take out Krogdalo's Sanctuary from another character, it is affected by the flute item owned by the current character.
- Celestial Horse Calling Horn: Unlimited call distance
- Trainer's Flute: 500 call distance
- Default: 150 call distance
Example: If a horse is taken out at a location 600 units away from a Ranger who owns Krogdalo's Sanctuary, a Warrior wishing to bring the Sanctuary over via a maid/butler must first be able to call the horse. In this case, the Warrior must own a Celestial Horse Calling Horn.
◈ How to Obtain
While mounted on one of the three mythical horses, visit Merindora in Grána to accept the [Krogdalo's Sanctuary] questline. The quests will require you to possess the three mythical horses to complete them and receive the King of Celestial Horses' sanctuary.
You can read more about mythical horses and this treasure on the [Mythical Horses] page.
Lafi Bedmountain's Upgraded Telescope
When Ulukita, a region of ancient weapons, the power of darkness, and lawless people was revealed, Lafi Bedmountain decided to create a new invention using unique parts found only there.
This treasure can be said to be the opposite of Lafi Bedmountain's Upgraded Compass. Instead of moving other Adventurers to your location, it moves you to their position.

◈ How to Create Lafi Bedmountain's Upgraded Telescope
You need a total of 5 different materials to create Lafi Bedmountain's Upgraded Telescope:
The Upgraded Telescope Parts (3 unique items), and 2 gemstones (Star Diamond and Gold Topaz).
The Lafi Bedmountain's Upgraded Telescope requires all 3 different unique parts.
| Image | Item | How to Obtain |
| Lafi Bedmountain's Upgraded Telescope Parts | Rarely found throughout the lawless lands of Ulukita. | |
| Rarely found throughout the lawless lands of Ulukita, or by exchanging 3 units of a specific compass part with NPC Ulubala. |
As seen in the table above, it is said that somewhere in Ulukita, scholar Ulubala has already excavated one of the several types of parts Lafi Bedmountain is researching. They are conducting research on Lafi Bedmountain's Upgraded Compass, and if given 3 units of a specific compass part shown below, they will exchange them for the telescope part they excavated.
| Required Items | Exchange Item |
|
Lafi Bedmountain's Upgraded Compass Parts x3
(Only the compass parts appraised via Ain Greid can be exchanged) |
Lafi Bedmountain's Upgraded Telescope Part
|
Additionally, 2 gemstones (Star Diamond and Gold Topaz) are also required along with the Upgraded Telescope Parts to craft the treasure.
Once all the materials have been collected, arrange them in Yaz's Combinables Pouch (Inventory) as you see below to combine the gemstones with the telescope parts.

Arrange the items in that shape to obtain Lafi Bedmountain's Upgraded Telescope.
(Materials can be combined without appraising the compass parts as long as the correct compass parts are in their proper slot.)
Remitaronsom's Lumaloft Lamp
In the hallowed depths of the Tooth Fairy Forest, the chieftain Remitaronsom has crafted a wondrous artifact from the very light of the woods: the legendary Remitaronsom's Lumaloft Lamp.

- When placed on the Peridot Forest Path Wagon, which is also enchanted with natural magic, it strengthens and refreshes the wagon's energy.
- The lamp's magical power lets it float above the wagon, glowing softly and lighting the way as it moves through the forest.

In order to obtain the pieces of the treasures, you will need to deliver any type of horse to the Imperial Delivery. Keep in mind that the chances to obtain these items are really low.
 Remitaronsom's Lumaloft Lamp
|
|
 Faelight Fragment
|
 Lumentrace
|
|
Imperial Delivery of Tier 6-8 horses (very low chance)
Imperial Delivery of Dream horses (very low chance) |
Imperial Delivery of Imperial Steeds (very low chance) |
Once you have all the treasure pieces, arrange the items in the below shape in Yaz's Pouch:

* The content of the game guide may differ from the actual game content, depending on the update and content changes.