Weltbosse
Zeitpunkt der letzten Änderungen : 15. Apr 2026, 07:52 (UTC)
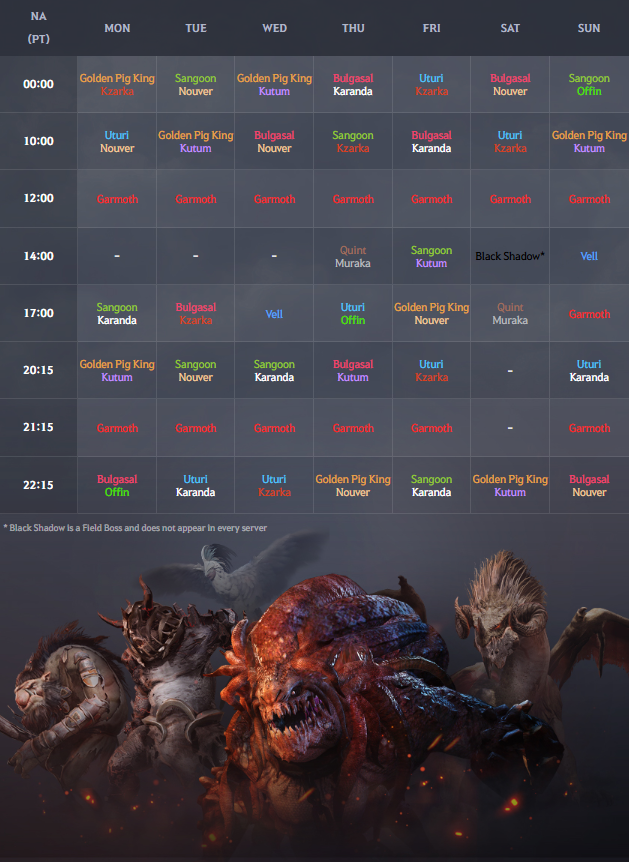
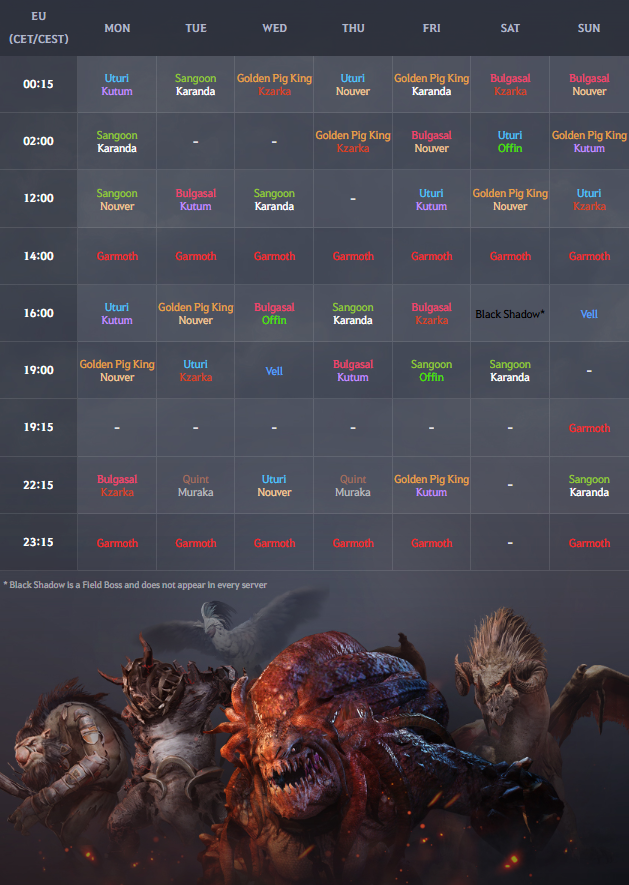
Zeitplan für das Erscheinen der Weltbosse (in Black Desert)
NA
EU
Erscheinungsbenachrichtigung für Weltbosse

▲ Systembenachrichtigungen zur Ankunft der verschiedenen Weltbosse erscheinen in der Mitte Eures Bildschirms.
Die Weltbosse erscheinen an bestimmten Orten, und jeder kann dem Kampf beitreten. Allerdings ist es am besten, Eure AK und VK auf eine entsprechend hohe Stufe zu bringen, um nicht ihren Angriffen zu erliegen, besonders wenn es die erweckten Versionen des Bosses sind!
Sobald ein Weltboss besiegt wurde, erhalten Abenteurer die Beute basierend auf dem „verursachten Schaden“. Dennoch solltet Ihr Euch nicht zu viele Sorgen darüber machen, gute Ausrüstung zu erlangen. Die Anzahl des zugefügten Schadens ist nur eines der Kriterien, daher könnt Ihr mit etwas Glück trotzdem die beste Beute erhalten.
Weltbosse verschwinden automatisch, falls sie nicht innerhalb von 30 Minuten besiegt werden. (Bei Quint/Muraka beträgt diese Dauer nur 15 Minuten.)
Ihr könnt von fast jedem Server aus am Kampf gegen den Weltboss teilnehmen, da die LP des Weltbosses über alle Server geteilt werden.
Außerdem verliert Ihr beim Kampf gegen die Bosse keine EP und Eure Kristalle können nicht zersplittern.
Einstellung einer Erinnerung für Weltbosse
Ihr könnt eine Erinnerung einrichten, die Euch vor der Erscheinung der Weltbosse über diese informiert. Geht zum Hauptmenü (ESC) > Abenteuer (F5) > Boss-Benachrichtigung.

Ihr könnt die Benachrichtigung einstellen, sodass diese entweder 5, 15 oder 30 Minuten vor Erscheinen des Bosses erscheint.
Ihr könnt eine Erinnerung einrichten, die Euch vor der Erscheinung der Weltbosse über diese informiert. Geht zum Hauptmenü (ESC) > Abenteuer (F5) > Boss-Benachrichtigung.
Ihr könnt die Benachrichtigung einstellen, sodass diese entweder 5, 15 oder 30 Minuten vor Erscheinen des Bosses erscheint.
Kzarka

Kzarka, der Fürst der Verderbnis, ist einer der einfacheren Weltbosse in der Welt von Black Desert.
Wenn Kzarka gegenüber Angriffen immun wird, bedeutet dies, dass er einen großflächigen Feueratem entfesselt. Wenn dies passiert, müsst Ihr Euch hinter einer der Säulen verstecken, um den Schaden zu neutralisieren.
Falls Ihr Euch zum ersten Mal diesen Boss stellt, solltet Ihr Euch an den Bewegungen der anderen Abenteurer orientieren. Wenn sich die anderen Abenteurer zurückziehen, solltet Ihr es ihnen gleich tun, um den mächtigen Angriffen von Kzarka auszuweichen.
Ihr habt nach dem Kampf die Chance auf „Kzarkas versiegelte Waffenkiste“. Solltet Ihr diese Kiste erhalten, könnt Ihr durch das Klicken mit der rechten Maustaste eine Kzarka-Hauptwaffe für Eure Klasse erhalten.

◈ Albtraumhafter Kzarka
 ▲ Der Albtraumhafte Kzarka erscheint mit Flächenschaden
|
 ▲ Kzarka entfesselt eine Reihe von Angriffen und Flächenangriffen
|
 ▲ Kzarka brüllt und greift mit einem schwarzen Atemangriff an
|
 ▲ Ein Angriff, bei dem nahe Ziele eingesogen und mit viel Schaden angegriffen werden
|
 ▲ Kzarka beschwört Tentakel, die Euch bei einem Treffer mit einem Bewegungs-/Angriffstempo-Debuff belegen
|
 ▲ Angriffe in Rage, die Chaos stiften
|
Wenn Kzarka erscheint, besteht die Chance, dass stattdessen ein Albtraumhafter Kzarka erscheint.
Ihr solltet Euch auf die spontane Erscheinung eines Albtraumhaften Kzarkas gut vorbereiten.
Der Albtraumhafte Kzarka kann Euch relativ leicht töten, da er viel mächtiger als der normale Kzarka ist und mehrere Angriffsmuster besitzt.
Allerdings könnt Ihr vom Albtraumhaften Kzarka auch bessere Beute erlangen. Dazu zählt eine Kzarka-Hauptwaffenkiste, die eine Kzarka-Hauptwaffe mit bis zu Verstärkungsstufe TET (IV) beinhalten kann.
Anmerkungen
* Ihr müsst mindestens 0,01 % Schaden an den Gesamt-LP (die über alle Server geteilt werden) des Albtraumhaften Kzarkas verursachen, um Beute erhalten zu können.
* Ihr müsst mindestens 0,01 % Schaden an den Gesamt-LP (die über alle Server geteilt werden) des Albtraumhaften Kzarkas verursachen, um Beute erhalten zu können.
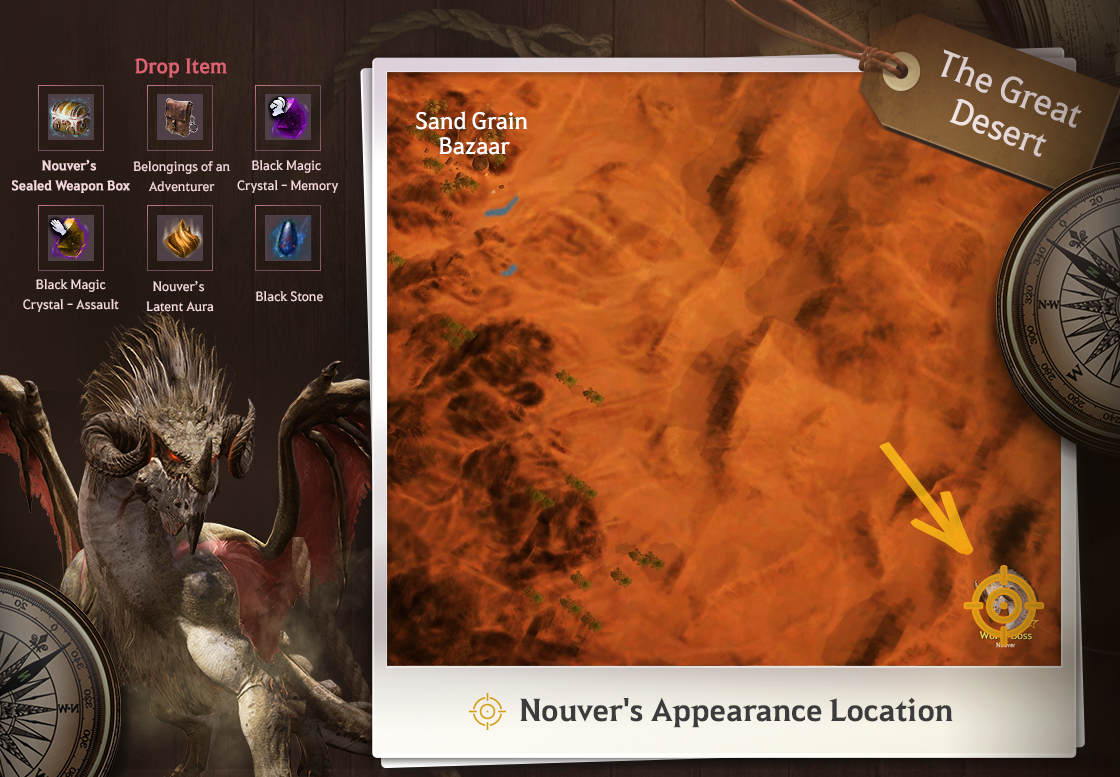
Nouver

Zur Vorbereitung auf den Kampf solltet Ihr Euch „Gesäubertes Wasser“ und „Sternanistee“ besorgen, da der Kampf gegen Nouver in der Wüste stattfindet.
Beim Kampf solltet Ihr Euch darauf vorbereiten, Euch schnell von Nouver zu entfernen, um nicht in seine Tornados gesogen zu werden. Vergesst ebenfalls nicht, Euch zur Seite zu bewegen, wenn er seinen Kopf nach hinten bewegt, da er direkt danach seinen Feueratem entfesselt. Dieser Angriff fügt jedem Ziel in seinem Weg hohen Schaden zu.
Auch in der Luft entfesselt Nouver mächtige Angriffe, weswegen Ihr jederzeit auf die Verwendung Eures Blocks, Eurer Ausweich- und Unverwundbarkeitstalente vorbereitet sein solltet. Entfernt Euch von den anderen Abenteurern, um Euch auf einen Flächenangriff vorzubereiten, falls Nouver sich in die Lüfte erhebt.
Mit etwas Glück könnt Ihr [Nouvers versiegelte Sekundärwaffen-Kiste] erhalten. Klickt mit der rechten Maustaste auf „Nouvers versiegelte Sekundärwaffen-Kiste“, um eine Nouver-Sekundärwaffe für Eure Klasse zu erhalten.
◈ Blutrünstiger Nouver
 ▲ Erscheint mit einem mächtigen Sturm
|
 ▲ Entfesselt zweifachen Feueratem nacheinander
|
 ▲ Erschafft mithilfe des Sandsturms Schattendoppelgänger
|
 ▲ Stößt ein lautes Geheul aus und beschwört einen mächtigen Sandwirbel
|
 ▲ Angriff aus der Luft mit 3 Phasen
|
 ▲ Schlägt auf den Boden, um im gesamten Bereich Zerstörung anzurichten
|
Wenn Nouver erscheint, besteht die Chance, dass stattdessen ein Blutrünstiger Nouver erscheint.
Ihr solltet Euch gut auf den Kampf gegen diesen Boss vorbereiten, da er viel mächtiger als der normale Nouver ist und neue Angriffsmuster sowie mächtigere Flächenangriffe inkl. Tornados und Illusionen entfesseln kann.
Beim Besiegen des Blutrünstigen Nouvers könnt Ihr noch mächtigere Beute erhalten. Dazu zählt eine Sekundärwaffen-Kiste, die eine Nouver-Sekundärwaffe mit Verstärkungsstufe bis zu TET (IV) beinhalten kann.
Außerdem gibt es die Chance auf zwei besondere Gegenstände: Den „Flügelfetzen des Blutrünstigen Nouver“ und das „Hornstück des Blutrünstigen Nouver“, welche beide zur Herstellung eines besonderen Nouver-Outfits benötigt werden.

➤Besucht die Seite [Besondere Outfits], um mehr darüber zu erfahren, wie Ihr das Nouverikant-Outfit herstellen könnt.
Anmerkungen
* Ihr müsst mindestens 0,01 % Schaden an den Gesamt-LP (die über alle Server geteilt werden) des Blutrünstigen Nouvers verursachen, um Beute erhalten zu können.
* Ihr müsst mindestens 0,01 % Schaden an den Gesamt-LP (die über alle Server geteilt werden) des Blutrünstigen Nouvers verursachen, um Beute erhalten zu können.
Karanda

Ihr könnt Karanda nur auf dem Karandakamm in Calpheon begegnen. Dieser Weltboss ist relativ stark und besitzt viele Angriffsmuster. Zusätzlich erschwert das raue Terrain und der begrenzte Kampfbereich des Kamms den Kampf gegen die Harpyienkönigin.
Es gibt zwei Angriffe, die besonders zu beachten sind: Beim ersten Angriff fliegt sie plötzlich in die Lüfte und entfesselt einen Flächenangriff in einem großen Bereich außerhalb des Kreises um sie herum. Bei diesem Angriff müsst Ihr Euch ihr schnell nähern. Beim zweiten Angriff landet sie kurz und hebt dann erneut ab. Dieser Flächenangriff verursacht Schaden um sie herum, weswegen Ihr Euch hier von ihr wegbewegen müsst.
Mit etwas Glück könnt Ihr eine [Löwenzahn-Waffenkiste] erhalten. Öffnet die Kiste durch einen Klick mit der rechten Maustaste, um eine Löwenzahn-Erweckungswaffe für Eure Klasse zu erhalten.

◈ Sturmbringerin Karanda
Wenn Karanda erscheint, besteht die Chance, dass stattdessen eine Sturmbringerin Karanda erscheint.
Ihr müsst Euch gut auf die von ihr beschworenen Wirbelwinde vorbereiten.
Ihr müsst besonders vorsichtig sein, da die verbesserten Angriffsmuster Euch in die Lüfte schleudern können, was zu (tödlichem) Fallschaden führen kann.
 ▲ Ankunft der Sturmbringerin Karanda
|
 ▲ Verstärkte Federangriffe
|
 ▲ Angriffe, die mächtige Windböen beschwören
|
 ▲ Bossmuster, die zufälligen, vernichtenden Schaden durch das Beschwören endloser Harpyien verursachen
|
 ▲ Ein Bossangriff, der alles rund um Karanda mit einer Schwungattacke wegfegt und dann Schaden im äußeren Bereich verursacht
|
 ▲ Karanda beschwört einen mächtigen Sturm mit der Hilfe der Harpyien
|
Beim Besiegen der Sturmbringerin Karanda könnt Ihr viel wertvollere Beute erhalten. Dazu zählt „Karandas Herz“, mit dem Ihr Eure Erweckungswaffe mit einem Kristallsockel und „Kritischer Trefferschaden +3 %“ verbessern könnt, sowie eine Erweckungswaffen-Kiste, die eine Löwenzahn-Erweckungswaffe mit bis zu Verstärkungsstufe TET (IV) beinhalten kann.

Anmerkungen
* Ihr müsst mindestens 0,01 % Schaden an den Gesamt-LP (die über alle Server geteilt werden) der Sturmbringerin Karanda verursachen, um Beute erhalten zu können.
* Ihr müsst mindestens 0,01 % Schaden an den Gesamt-LP (die über alle Server geteilt werden) der Sturmbringerin Karanda verursachen, um Beute erhalten zu können.
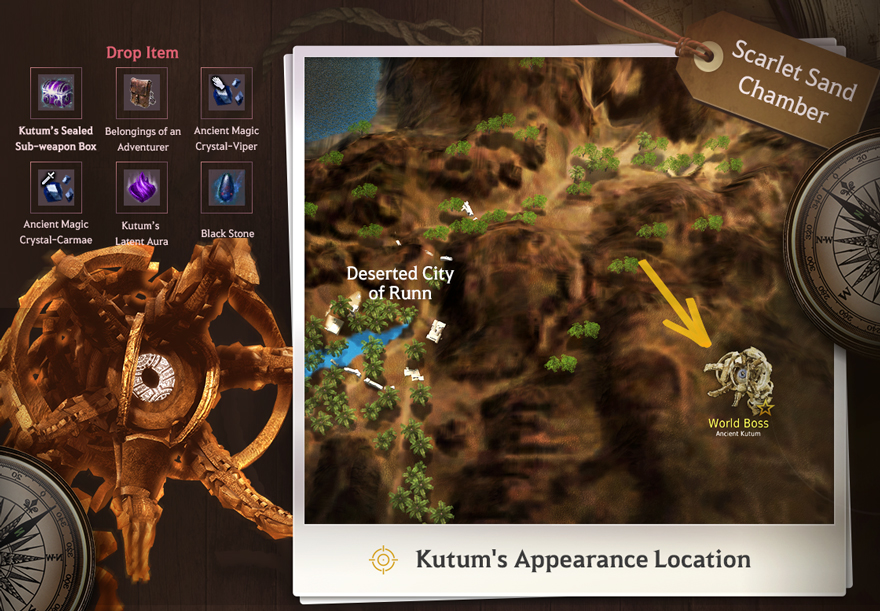
Kutum

Kutums Körper ähnelt einem Sandwurm, und er bewegt seinen Körper bei Angriffen durch die Arena. Außerdem besitzt er mächtige Talenteffekte, die es ihm erlauben, alles um ihn herum einzusaugen.
Er besitzt auch einen Fernkampfangriff, bei dem er Staub ausspuckt, was Ziele betäubt. Außerdem gräbt er sich ein und springt anschließend auf seine Beute.
Ihr solltet immer wachsam bleiben, da der Boss elektrische Ladungen ausstößt, sobald seine LP unter 50 % betragen.
Stellt sicher, dass Ihr dem Staubwirbel ausweicht, der entsteht, wenn er sich aus dem Boden gräbt.
Mit etwas Glück könnt Ihr [Kutums versiegelte Sekundärwaffen-Kiste] erhalten. Klickt mit der rechten Maustaste auf „Kutums versiegelte Sekundärwaffen-Kiste“, um eine Kutum-Sekundärwaffe für Eure Klasse zu erhalten.
Die Sekundärwaffen von Kutum sind besonders bei Abenteurern im PvE beliebt, da diese viel Monsterschaden geben. Für das PvP bevorzugen viele Abenteurer die Sekundärwaffe von Nouver, da diese mehr AK gewährt.
◈ Donnergrollender Kutum
Wenn Kutum erscheint, besteht die Chance, dass stattdessen ein Donnergrollender Kutum erscheint. Er besitzt mächtige Talente und greift mit verschiedenen Angriffsmustern an. Zusätzlich beschwört er Donnerwolken während des Kampfes. Betrachtet diese Wolken als kleines Rätsel. Falls Ihr von den Wolken betroffen werdet, werdet ihr einen Debuff erhalten, der kontinuierlich Eure LP verringert. An den Seiten des Raumes findet Ihr zwei Steinkammern. Betretet einfach die Kammer mit der jeweiligen Farbe der Wolke, um diese zu reinigen.
Behaltet die LP des Donnergrollenden Kutums im Auge, da er mächtige Angriffe wie das Beschwören Vorzeitlicher Waffen entfesselt, sobald seine LP einen bestimmten Wert unterschreiten.
 ▲ Der Donnergrollende Kutum erscheint
|
 ▲ Kutum lässt mehrere Donnerblitze in seiner Höhle regnen
|
 ▲ Kutum greift mit elektrischen Stürmen an
|
 ▲ Kutum greift an, indem er aus dem Boden auftaucht
|
 ▲ Kutum beschwört vorzeitliche Waffen
|
 ▲ Kutum beschwört eine elektrische Sphäre, die sich zufällig bewegt
|
 ▲ Kutum saugt alles in seiner Umgebung ein
|
 ▲ Kutum greift mit einem Schwungangriff an und greift anschließend die andere Seite an
|
Beim Besiegen vom Donnergrollenden Kutum könnt Ihr mit etwas Glück „Kutums Kraftstein“, einen offensiven Alchemiestein, erhalten. Er erlaubt es Euch, den Monstern, um Euch herum, Schaden zuzufügen und deren VK zu verringern. Ihr solltet allerdings beachten, dass dieser Alchemiestein nicht aufgeladen werden kann.
Beim Besiegen des Donnergrollenden Kutums könnt Ihr auch noch wertvollere Beute erhalten. Dazu zählt „Kutums Herz“, mit dem Ihr Eurer Sekundärwaffe den Effekt „Spezialangriff-Ausweichrate +7 %“ gewähren könnt. Außerdem könnt Ihr eine Waffenkiste erhalten, aus der Ihr Kutums-Sekundärwaffe mit Verstärkungsstufen bis zu TET (IV) erhalten könnt.


Anmerkungen
* Ihr müsst mindestens 0,01 % Schaden an den Gesamt-LP (die über alle Server geteilt werden) des Donnergrollenden Kutums verursachen, um Beute erhalten zu können.
* Ihr müsst mindestens 0,01 % Schaden an den Gesamt-LP (die über alle Server geteilt werden) des Donnergrollenden Kutums verursachen, um Beute erhalten zu können.
Quint

▲ Quint ist größer als gewöhnliche Trolle.
Ihr könnt beim Quintenhügel im nördlichen Calpheon eine riesige Trollstatue sehen. Das ist Quint, auch als erster Troll bekannt.
Nachdem die Systemnachricht zu Quints Aufwachen erscheint, tänzelt Quint wild herum, während er versucht, seiner versteinerten Form zu entkommen.
Quint ist relativ langsam, weswegen seinen Angriffen mit genügend Fokus sehr leicht ausgewichen werden kann. Ihr solltet Euch dennoch nicht zu sehr auf LP-Tränke verlassen, da seine direkten Treffer schweren Schaden verursachen können.
Mit sinkenden LP steigen das Angriffstempo und die AK von Quint, also bleibt immer auf der Hut.
Beute: ★ Quint-Statue, Besitztümer eines Abenteurers, Schwarzmagiekristall – Hystria, Schwarzmagiekristall – Harphia, Mutantenverstärker, Goldbarren 100 g, Goldbarren 10 g und mehr.
- Abenteurer, die sich in den oberen 70 % des Beitrags zur Unterwerfung befinden, können mit bestimmter Wahrscheinlichkeit 1 - 5 Fragmente der Kälte erhalten.
- Abenteurer, die sich in den 100 % des Beitrags zur Unterwerfung befinden, können mit bestimmter Wahrscheinlichkeit 1 - 2 Fragmente der Kälte erhalten.
(Wenn Ihr 100 dieser Gegenstände sammelt, könnt Ihr sie für ein Deboreka-Accessoire eintauschen.)
◈ Ort von Quint

▲ Quintenhügel, nördliches Calpheon
Muraka

▲ Der Ogerkönig Muraka ist mit schwarzen, kristallisierten Schuppen übersät. Seine LP sind höher als die eines regulären Ogers.
Muraka ist ein riesiger Oger, dessen Rücken mit schwarzen, kristallisierten Schuppen versehen ist. Seine LP sind höher als die eines regulären Ogers.
Die Furcht einflößende Präsenz von Muraka hat ihm den Titel als Ogerkönig eingebracht. Muraka erscheint in den Tiefen des Manshawaldes, wo sich die Mansha und anderen Oger aufhalten. Macht nicht den Fehler, diese mit ihm vergleichen zu wollen.
Muraka ist ähnlich langsam wie Quint und seinen Angriffen kann relativ leicht ausgewichen werden. Allerdings solltet Ihr nicht die mächtigen Flächenangriffe von Muraka unterschätzen, da er Euch sonst relativ schnell auf den kalten Boden der Tatsachen holen kann.
Beachtet, dass sich das Angriffstempo und die AK von Muraka stark erhöhen, wenn seine LP sinken. Sobald seine LP besonders niedrig sind, kann Euer Charakter durch eine einzige Attacke sterben. Dabei schlägt Muraka mit seinen Fäusten auf den Boden, was selbst bei Charakteren mit vollständiger TET (IV)-Rüstung zum sofortigen Tode führen kann.
Also, warum stellt Ihr Euch nicht der Herausforderung? Greift kontinuierlich die Beine von Muraka an, damit er hinfällt und Ihr so mehr Schaden verursachen könnt. Immerhin ist er genauso riesig wie Quint.
Beute: ★ Matter Ogerring, Mutantenverstärker und mehr.
- Abenteurer, die sich in den oberen 70 % des Beitrags zur Unterwerfung befinden, können mit bestimmter Wahrscheinlichkeit 1 - 5 Fragmente der Kälte erhalten.
- Abenteurer, die sich in den 100 % des Beitrags zur Unterwerfung befinden, können mit bestimmter Wahrscheinlichkeit 1 - 2 Fragmente der Kälte erhalten.
(Wenn Ihr 100 dieser Gegenstände sammelt, könnt Ihr sie für ein Deboreka-Accessoire eintauschen.)
◈ Ort von Muraka

▲ Manshawald, südwestliches Calpheon.
Mirumok Offin Zerstörer

Der Mirumok Offin Zerstörer erscheint tief im Holo-Wald von Kamasilvia. Für den Kampf gegen diesen Weltboss solltet Ihr gut vorbereitet sein, da er einer der schwersten Bosse ist.
Offin ist ein Weltboss, der sich kontinuierlich verwandelt und kombiniert. Die große, baumähnliche Maschine ist der Mirumok Offin Zerstörer und der sie befehlende ist Offin-Wächter Tett. Offin besitzt vier Beine und einen riesigen Körper, wohingegen Offin Tett im Inneren sitzt und den Zerstörer kontrolliert. Ihr könnt zu Beginn des Kampfes nur die Beine von Offin angreifen.
Sobald Ihr eine bestimmte Menge an Schaden an den Beinen des Offins verursacht habt, steigt Offin Tett persönlich aus dem Offin. Solange Offin Tett sich nicht im Offin befindet, funktioniert dieser auch nicht. Aber das bedeutet nicht, dass der Kampf dadurch einfacher wird. Offin Tett kann mehrere Klone von sich erschaffen und verwendet mächtige Angriffe, als bleibt wachsam.
Sobald die LP von Offin Tett einen bestimmten Schwellenwert unterschreiten, begibt er sich zurück in den Offin, um weiterzukämpfen.
Beim Besiegen von Vell könnt Ihr mit etwas Glück „Offin Tetts versiegelte Strahlende Waffenkiste“ erhalten. Öffnet die Kiste, um Offin Tetts Strahlende Hauptwaffe für Eure Klasse zu erhalten.
Offin Tetts Strahlende Hauptwaffe besitzt weniger Präzision, aber mehr AK als Kzarkas Hauptwaffe.

Garmoth

Garmoth, die Blutrote, erscheint in Garmoths Nest im zentralen Drieghan.
Sie ist viel mächtiger als die Version, die Ihr während der Hauptquestreihe von Drieghan besiegt, weswegen es eine gute Idee ist, sich gut auf diese Herausforderung vorzubereiten.
Genau wie Nouver handelt es sich bei Garmoth um einen riesigen Drachen. Allerdings liegt der Hauptunterschied zwischen beiden in den Flächenangriffen von Garmoth. Passt auf die Flächenangriffe der Blutroten Ausschau, da diese in Abhängigkeit der absorbierten Magiemenge tödlich sein können.
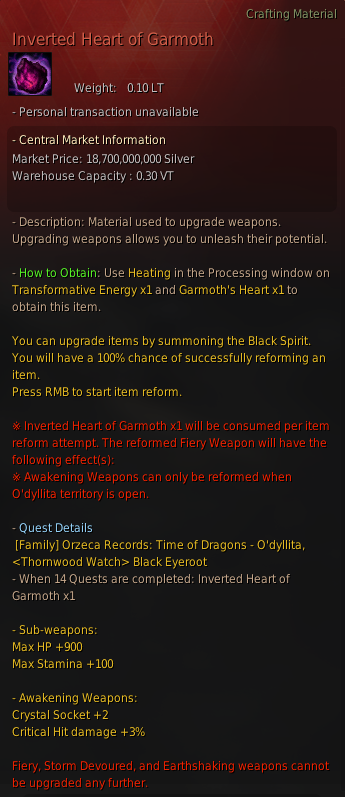
Beim Besiegen von Garmoth könnt Ihr mit etwas Glück „Garmoths Herz“ erhalten. Garmoths Herz dient wie Karandas Herz dazu, bestimmte Waffen zu verbessern. In diesem Falle handelt es sich dabei um Erweckungs- und Sekundärwaffen (Nouver und Kutum).
Verbesserte Erweckungswaffen erhalten dabei zwei zusätzliche Kristallsockel und den Effekt „Kritischer Trefferschaden +3 %“. Verbesserte Sekundärwaffen hingegen erhalten die folgenden Effekte: Max. LP +150, Max. Ausdauer +100 und Spezialangriff-Ausweichrate +10 %.
Um Waffen mit Garmoths Herz verbessern zu können, müsst Ihr es zunächst durch eine Quest zum „Umgekehrten Herz von Garmoth“ umwandeln.

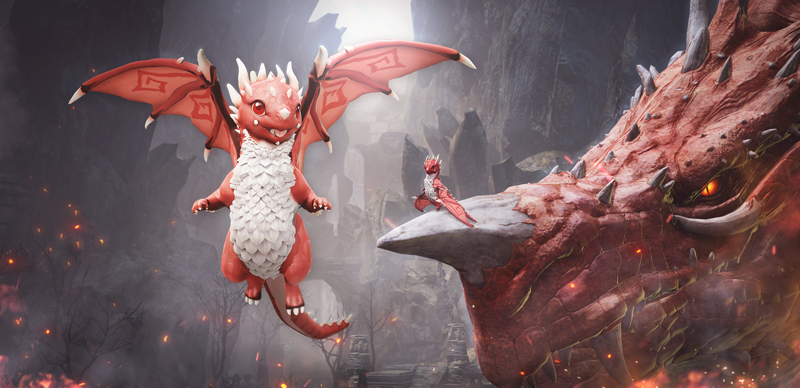
Außerdem besteht die geringe Chance auf den Erhalt von Garmoths Horn. Mit diesem Gegenstand könnt Ihr einen Drachenbegleiter erhalten, der wie Garmoth aussieht und „Max. LP +25“ als besonderes Talent besitzt.
Beachtet, dass dieser Begleiter nur mit einem weiteren Begleiter des gleichen Typs getauscht werden kann. Magische Holterdiepolter funktionieren nicht.
Wichtig!
- Die Beute von Garmoth landet nicht direkt in Eurem Inventar. Klickt den Button „Belohnung abholen“, der oben rechts in Eurem UI erscheint, um die Beute zu erhalten.
- Ihr könnt 3 x pro Woche Beute von Garmoth erhalten, und die wöchentlichen Quests werden jeden Donnerstag um 00:00 Uhr (UTC) zurückgesetzt.

Vell

▲ Vell, das Herz des Ozeans, erscheint in den Tiefen Margorias, im sogenannten Reich von Vell.
Bei anderen Weltbossen informiert Euch das Spiel 15 Minuten vor der Erscheinung. Bei Vell hingegen seht Ihr eine Systemnachricht oben auf dem Bildschirm, die Euch 30 Minuten vor Erscheinen darüber informiert. Dies liegt daran, dass Ihr zum Erreichen des Erscheinungsorts eine längere Strecke zurücklegen müsst.
Zu Beginn erscheint ein Wasserstrudel vor dem eigentlichen Erscheinen von Vell. Falls Ihr in den Strudel gesogen werdet, könnt Ihr und Schiff erheblichen Schaden erleiden. Stellt sicher, dass Ihr Vell mit genügend Vorsicht begegnet, da er bei seiner Erscheinung viel Schaden an Abenteurern in seinem Gebiet verursachen kann. Während des Kampfes wird er immer wütender und zerstört das Siegel, dass ihn gebunden hat.
Zu Beginn des Kampfes verwendet Vell seine Fragmente, die Lopter, und versucht, so die Schiffe zu zerstören. Die sich nähernden Lopter können mithilfe von Musketen besiegt werden.
Vell erleidet nur durch Schiffskanonen Schaden. Vell wehrt sich regelmäßig mächtigen Wasseratem-Angriffen, weswegen es ratsam ist, sich immer in Bewegung zu halten.
Beim Kampf gegen Vell erhalten alle Gruppen-/Truppenmitglieder die gleiche Menge an Kampf-EP, auch wenn ein Mitglied das Talent „Fokussiertes Feuer“ verwendet.
Jedes Crewmitglied sollte versuchen, seine Aufgabe bestmöglich zu erfüllen. Ganz gleich, ob es sich um den Steuermann, die Musketenschützen gegen die Lopter, oder die Scouts handelt.
Falls Ihr Euch für eine Wiederbelebung in der nächsten Stadt entscheidet, werdet Ihr am Auge von Oquilla wiederbelebt.
Falls Ihr Euch für eine Wiederbelebung am nächstgelegenen Posten entscheidet, werdet Ihr auf dem offenen Meer in der Nähe des Reichs von Vell wiederbelebt. Wartet nach der Posten-Wiederbelebung auf andere Abenteurer, da sich in der Nähe Schiffswracks und Bojen befinden.
Sobald Vell eine bestimmte Menge an Schaden erlitten hat, wird er wütend und entfesselt einen vernichtenden Flächenangriff. Wenn dies geschieht, wird jeder Abenteurer auf der Wasseroberfläche von einem großen Tsunami getötet. Ihr könnt die bevorstehende Flutwelle entweder durch das Festhalten auf Eurem Schiff oder das Untertauchen überleben.
Ihr könnt die Belohnung für die Unterwerfung von Vell über den Tresor des Schwarzgeists erhalten. Beim Besiegen von Vell könnt Ihr mit etwas Glück „Vells Herz“, einen wiederaufladbaren, offensiven Alchemiestein, erhalten. Falls Ihr „Vells Konzentrierte Magie“ erhaltet, könnt Ihr diese durch [Einfache Alchemie] mit 1.500 „Alchemiesteinsplittern“ verarbeiten, um so Vells Herz herzustellen.


Land des Morgenlichts
Ihr könnt einigen Bossen des Legenden-Tagebuchs und des Finsteren Schreins der Donghae- und Hwanghae-Provinz als Weltbossen begegnen.
Im Land des Morgenlichts könnt Ihr die Beute der Bosse einmal pro Woche pro Boss erhalten. Besiegt jeden Boss und beansprucht die Beute durch das Regionsquest-UI am oberen rechten Rand Eures Bildschirms.
Anmerkungen
- Die Regionsquest jedes Bosses ist eine wöchentliche Quest, die jeden Donnerstag um Mitternacht (00:00 Uhr UTC) zurückgesetzt wird.
- Die vier verschiedenen Weltbosse im Land des Morgenlichts erscheinen zwischen 11 und 12 Mal pro Woche. Ihr müsst jeden Boss nur einmal pro Woche besiegen, um alle möglichen Belohnungen zu erhalten.
- Selbst wenn Ihr die Hauptquestreihe des Lands des Morgenlichts nicht abgeschlossen habt, könnt Ihr die Beute dieser Regionsquests erhalten.
Beim Besiegen der Weltbosse im Land des Morgenlichts haben die 10 Abenteurer mit dem höchsten Beitrag eines jeden Servers die Chance, mit sehr geringer Wahrscheinlichkeit die „Urzeitliche Flamme“ zu erhalten.

◈ König der Aurumschweine

Beute: ★ Urzeitliche Flamme, Urzeitliche Glut, Urzeitlicher Kristall, Asadal-Gürtel, Veredelungsstein - Gesamte AK/Gesamte Präzision/Gesamte Schadensreduktion/Max. LP/Kritische Trefferquote/Kritischer Trefferschaden/Groll des Schwarzgeistes, Goldbarren 1.000 g, Bündel mit Caphras-Steinen, Rat von Valks (+40), Rat von Valks (+30) und mehr.
◈ Sangun

Beute: ★ Urzeitliche Flamme, Urzeitliche Glut, Urzeitlicher Kristall, Asadal-Halskette, Veredelungsstein - Gesamte AK/Gesamte Präzision/Kritische Trefferquote/Hinterangriffsschaden/Abwärtsangriffsschaden/Luftangriffsschaden/Kritischer Trefferschaden/, Goldbarren 1.000 g, Bündel mit Caphras-Steinen, Rat von Valks (+40), Rat von Valks (+30) und mehr.
◈ Bulgasal

Beute: ★ Urzeitliche Flamme, Urzeitliche Glut, Urzeitlicher Kristall, Asadal-Halskette, Veredelungsstein - Gesamte Schadensreduktion/Max. LP/Groll des Schwarzgeistes/Rückstoß-/Rückwurfwiderstand umgehen/Niederschlag-/Umsturzwiderstand umgehen/Greifwiderstand umgehen/Betäubungs-/ Erstarrungs-/ Frostwiderstand umgehen, Goldbarren 1.000 g, Bündel mit Caphras-Steinen, Rat von Valks (+40), Rat von Valks (+30) und mehr.
◈ Uturi

Beute: ★ Urzeitliche Flamme, Urzeitliche Glut, Urzeitlicher Kristall, Asadal-Gürtel, Veredelungsstein - Gesamte AK/Gesamte Präzision/Gesamtes Ausweichen/Hinterangriffsschaden/Abwärtsangriffsschaden/Luftangriffsschaden/Kritischer Trefferschaden, Goldbarren 1.000 g, Bündel mit Caphras-Steinen, Rat von Valks (+40), Rat von Valks (+30) und mehr.
* Der Inhalt dieser Anleitung kann sich vom Inhalt im Spiel unterscheiden, je nach Änderungen und Updates an den Spielinhalten.