Workers
Dernière modification : 20 mars 2026, 21:18 (UTC)
There is a variety of life skill content in Black Desert.
Workers can be a great help when you want to enjoy these activities.
Their most important role is to gather ingredients from production nodes, or to craft items in town workshops.
Workers can be a great help when you want to enjoy these activities.
Their most important role is to gather ingredients from production nodes, or to craft items in town workshops.
Hiring / Firing Workers
Workers are NPCs that do certain types of work for your family of characters.
In order to hire a worker, you need to speak with a Work Supervisor NPC. They can be found in all cities, and certain towns.
To view the workers available for hire in a given town, you will need to spend energy to view the Worker of the Day window via the Contract Workers option.

You will spend 5 energy when you press the Contract Workers option, and a worker will randomly show up. You can hire this worker by pressing the Hire Worker button, or you can spend another 5 energy to check a different worker by clicking the View Another button.
Alternatively, you can select the View Continuously option, where you will be able to choose the minimum grade of the worker you are searching for, and how many workers you want to spend energy checking. The moment a worker of the chosen grade shows up, the window will stop selecting new ones.
Alternatively, you can select the View Continuously option, where you will be able to choose the minimum grade of the worker you are searching for, and how many workers you want to spend energy checking. The moment a worker of the chosen grade shows up, the window will stop selecting new ones.

Tip!
When your character runs out of Energy, you can draw from the Energy of other Family members.
When your character runs out of Energy, you can draw from the Energy of other Family members.
When you are hiring workers, you need to have a certain amount of silver. The amount required will depend on the grade of the worker. You cannot hire a worker if you do not have enough silver.
On top of that, remember that you will need to have enough energy to cycle through the different available workers for hire until one of your preference shows up.
There are also certain worker NPCs you will be able to find throughout the world who, upon establishing a friendly relationship with you, will offer you their services. The workers you can hire this way are limited to be of yellow grade, and their race, stats, and talents are fixed.
You can fire a worker by accessing the Worker List window. You can find this window by opening the World Map screen (hotkey: M) and clicking on the icon in the lower right portion of the screen.

You can also open this window from the main menu (hotkey: Esc) → Life → Worker List.
We recommend all Adventurers to assign the Worker List window to a hotkey. This can be done through the main menu → Settings → Interface Settings → UI Hotkeys. Scroll down until you find the Worker List option, and assign an unused hotkey to it. After this, apply and confirm the changes, and you will be able to open the Worker List window in most situations.
Once you are in this window, check the worker you want to fire, and press the icon showing a person's shape with an X. A warning window will appear indicating what exact worker you are attempting to fire.
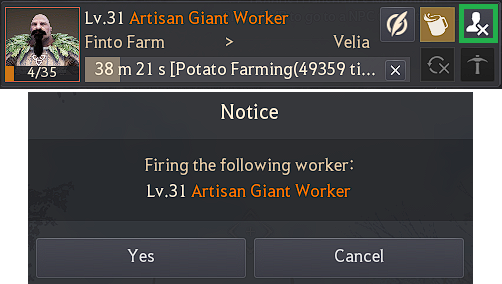
Pressing Yes in that window will permanently fire that worker. Please note that fired workers cannot be recovered.
◈ Lodging
You can get one worker for each town by default. For more workers, you will need to obtain lodging for them. For this, you need to repurpose a purchased house as lodging.

➤ You can read more about repurposing houses on the [Houses] page.
Worker Types
There are different types of workers one can find throughout Black Desert's world, depending on the town and society you are hiring them from: goblins, humans, giants, papus, faduses, dwarves, and more.
Goblin workers have the fastest working speed and movement speed, so they get the job done quickly compared to other workers. However, they cannot repeat the work task many times because their stamina is quite low.
Giant workers have high stamina so they can repeat the work assigned to them many times, but they are slow. They can also carry an increased amount of harvested items from a production node thanks to their Production Increase talent.
Human workers have balanced stats between giants and goblins.
They work and move at a moderate speed, and their stamina is higher than goblins' but lower than that of giants.
Regarding the workers one can obtain in Kamasylvia, papus are similar to goblins, while faduses can be said to be overall similar to human workers, but possessing the same talent that giants have. The dwarves you can hire in O'dyllita are, like papus, similar to goblins.
In the Land of the Morning Light, you can hire dokkebi, dolswe, and shellfolk workers. They are equivalent to goblin, human, and giant workers, from fastest to slowest, and from less to more stamina.
Additionally, dokkebi workers can not only work at production nodes but craft special items through the dokkebi-exclusive tool workshops, the "Dokkebi Jar". Certain nodes in the territory are also exclusive to dokkebi workers
Note
Please note that workers from other regions (e.g., Balenos) cannot perform tasks in the Land of the Morning Light, and that workers from the Land of the Morning Light cannot perform tasks in the other regions across the sea (e.g., Balenos).
Please note that workers from other regions (e.g., Balenos) cannot perform tasks in the Land of the Morning Light, and that workers from the Land of the Morning Light cannot perform tasks in the other regions across the sea (e.g., Balenos).
These different types of workers are categorized into five different levels depending on their statistics and quality.
Naive workers are the lowest grade, white, and they have the lowest stats. The only workers you can find of this grade are giants.
Workers without any title are green grade, and their stats are a little bit better than white grade workers. Above these you can find skilled, blue grade workers.
After them come the yellow grade professional workers, with stats much higher.
Finally, above even professional workers you can find artisan orange grade workers, who have the highest stats of all.
In the longer term, it is recommended you find a good amount of professional and artisan workers.

Regarding workers you can befriend out in the field, the advantage of hiring them is that you will get easy access to professional yellow grade workers just by increasing your amity with them. However, keep in mind that these workers cannot be promoted to artisan grade, since they cannot take the promotion test.

To raise your amity with these worker NPCs, you will need to converse with them.
➤ You can read more about energy and amity in the [Energy] and [Amity] pages.
Assigning Tasks to Workers
There are several ways to assign tasks to workers.◈ Production Nodes
You can send workers to a production node to collect resources.
Sending a worker to a node that has been invested in with contribution points will allow you to repeatedly collect resources from the area.
Sending a worker to a node that has been invested in with contribution points will allow you to repeatedly collect resources from the area.

You can repeat the work task 50,000 times, but as workers have a limited amount of stamina, you will have to restore their stamina from time to time.
➤ You can read more about investing in nodes in the [Node] and [Contribution] pages.
When you assign a work task to a worker, their stamina will be spent. You cannot order them to work when their stamina is depleted.
Once this happens, you need to press the Recover button in the Worker List window, next to their name, or the big Recover All button in the lower part of the window.
After this, a small window will appear in which you can select the food you want to give them.
You need certain types of food items, such as beer or grilled bird meat, in order to restore a worker's stamina.

The Recover All Workers window will also allow you to toggle on and off the option to auto-recover the stamina of workers by feeding them automatically with items in your family inventory.

The automatic recovery feature prioritizes the workers' stamina when it reaches 3 and by the sorting order of recovery items within the family inventory.
A notification will display when there are no worker recovery items in your Family Inventory.
➤ You can read more about the family inventory in the [Family Inventory] page.
◈ Town Workshops
Second, you can assign workers to town workshops.
In order to send workers to a production node, you need to invest in it. On the other hand, in order to send workers to a task in a house, this one must be acquired and then set as a workshop.
In order for the worker to be able to craft, the necessary materials need to be in the town's storage where the worker is located at, rather than where the workshop is located.

Keep in mind that you need to have enough materials in the storage of the town where the worker is from. Otherwise, they will not be able to work on crafting your desired items.
➤ You can read more about crafting in town workshops in the [Crafting] page.
◈ Investment Banks
Third, you can earn silver by sending workers to the different investment banks located in certain cities.

You will need gold bars in order to send workers there and generate a profit. You can buy these from the Currency Exchange option at every Storage Keeper NPC. Unlike other items, you will retain almost the full price of the original item except for a small amount of profit taken by the NPC.
Tip!
Keep in mind that you need to possess a house ranked in the first position in the town you want to make use of the investment bank. A house's rank is decided by the amount of furniture decoration points it has.
Keep in mind that you need to possess a house ranked in the first position in the town you want to make use of the investment bank. A house's rank is decided by the amount of furniture decoration points it has.
◈ Gardens
Finally, you can send workers to your fenced gardens to take care of the crops growing there.
When crops grow, they get tangled with each other, or insects appear at a certain probability. This will slow down the growth rate of your crops.
If you send a worker to a garden, they will prune the branches and catch the insects. This way, you will grow healthy crops.
When crops grow, they get tangled with each other, or insects appear at a certain probability. This will slow down the growth rate of your crops.
If you send a worker to a garden, they will prune the branches and catch the insects. This way, you will grow healthy crops.

➤ You can read more about gardens in the [Farming] page.
Worker List
As shown in the Hiring / Firing Workers section, you can access the Worker List window via the world map (hotkey: M) or the main menu (Esc → Life → Worker List).
You can make workers stop or repeat their work tasks. You can also look at the type of work they are doing at the moment, the remaining time for the task to be completed, and how many times they are going to repeat said task.
◈ Promotion Test
Every time a worker's level goes up by 10, they get a chance to take a promotion test. This test goes on for 8 hours, and multiple workers can take the test at the same time. If they pass the test, their grade will improve. For example, a skilled worker will become a professional worker.
The success rates for workers to pass promotion tests depend on their grade, regardless of level, and are the following.
|
Promotion |
Success Chance | ||
|
Normal → Skilled |
90% |
||
|
Skilled → Professional |
70% |
||
|
Professional → Artisan |
50% |
||
The written result of the promotion test of that worker will be sent to your Mail window (hotkey: B).

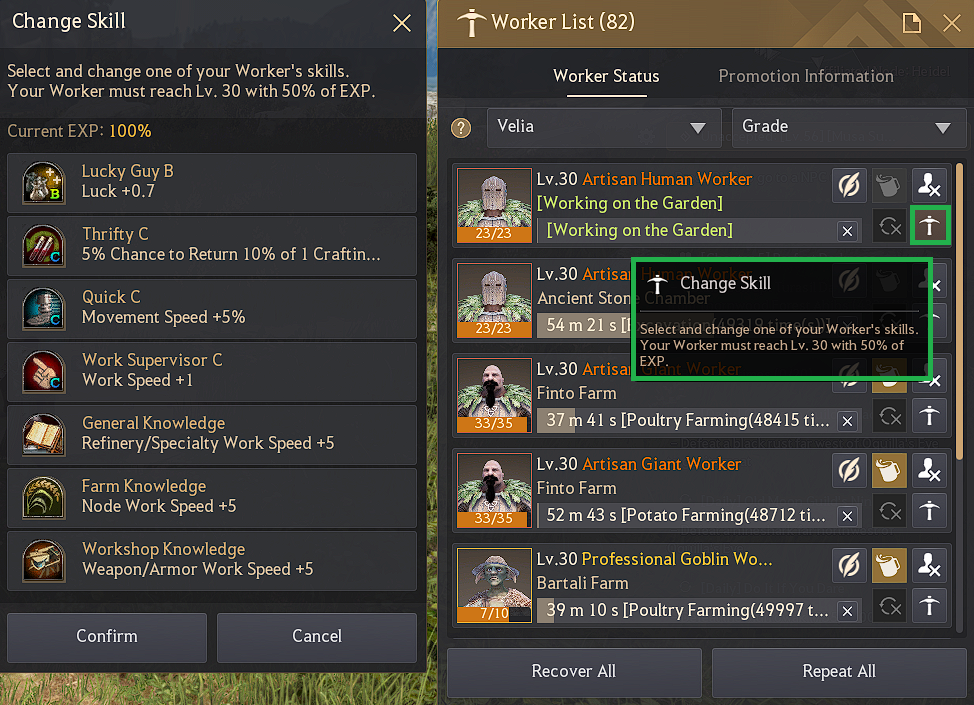
If you have a worker at level 30 or above, and their EXP is more than 20%, you can consume 20% of the EXP to change one of its skills to another random skill via this window, as well.
Never did I doubt you'd reach this far. Nothing gets in your way, it seems. Outstanding. Acceptable. Sounds like you will discover where to find the secret answer.
Sacred are the words in this Adventurer's Guide. Safeguarded, they are. Use these words. Right here. And the answer you're looking for, you'll have. Engulf yourself in this knowledge journey. Never forget: be Decisive, be Strong, be Savvy.
Sacred are the words in this Adventurer's Guide. Safeguarded, they are. Use these words. Right here. And the answer you're looking for, you'll have. Engulf yourself in this knowledge journey. Never forget: be Decisive, be Strong, be Savvy.
Pourrez-vous franchir le seuil ? Ou serez-vous de ceux qui le maintiendront fermé ?
Worker Skills
All workers start learning skills from level 1.They will level up as they work, and each time they increase 5 levels they will learn skills. When they reach level 40, they will have a total of 10 learned skills.
Workers learn skills mostly at random, so it is difficult to obtain workers with the skills you want.
Workers who gather materials from production nodes will be more efficient when they learn skills related to work speed or moving speed.
Packaging skills allow you to produce trade goods quickly. You can package items such as herbs, ore, mushrooms, fish, and much more. This is a skill that everyone wishes their workers to learn due to the extra profit it generates.

All workers will automatically learn the skill Delivery, which will allow them to transport goods from the production node they are assigned to work in, to a town storage of your choice.

If a worker passes a promotion test and becomes a higher grade worker, it will go back to level 1. As such, they will know only 1 skill at this point, and they will learn new skills when they level up.
The skills of yellow grade workers that you hire by befriending them are already set, so you should check which worker has the skills you need.

When normal workers reach Lv. 30, you can spend 20% of their EXP to change one of the skills that they have. The skills they learn will be decided at random, and you can try changing their skills again every time they have enough EXP from this point onward, even if they continue to level up on their way to Lv. 40.
It may be tedious if you are unlucky, but eventually you will have the perfect workers for the task at hand.
Worker Exchange
You can use the Worker Exchange function through the Worker Supervisor NPC.
You can register a worker who is on standby for sale, or hire other Adventurers' workers.
Their basic silver cost is different depending on their grade, and it goes up with the worker's acquired levels and skills.
When you hire a worker from the Worker Exchange window, you need to check what kind of skills the worker has and which town they are affiliated with.
When you hire a worker below artisan grade, you also need to check how many promotion tests they can take in the future.
It is useful to check this function from time to time in case you need a worker with a specific skill, or of a better grade than the ones you currently have in a given town.
Please note that certain workers, like those from the forests of Kamasylvia, cannot be exchanged.

* The content of the game guide may differ from the actual game content, depending on the update and content changes.