Interface
Last Edited on : Oct 4, 2024, 15:55 (UTC)
Black Desert lets you see all the basic, useful, and necessary information on the heads-up display (HUD). This information visible on screen can be modified via the Edit UI feature found in the main menu. Certain windows of the interface can also be moved outside of the game proper, allowing you to customize your screen's use thanks to the Sticker UI feature.
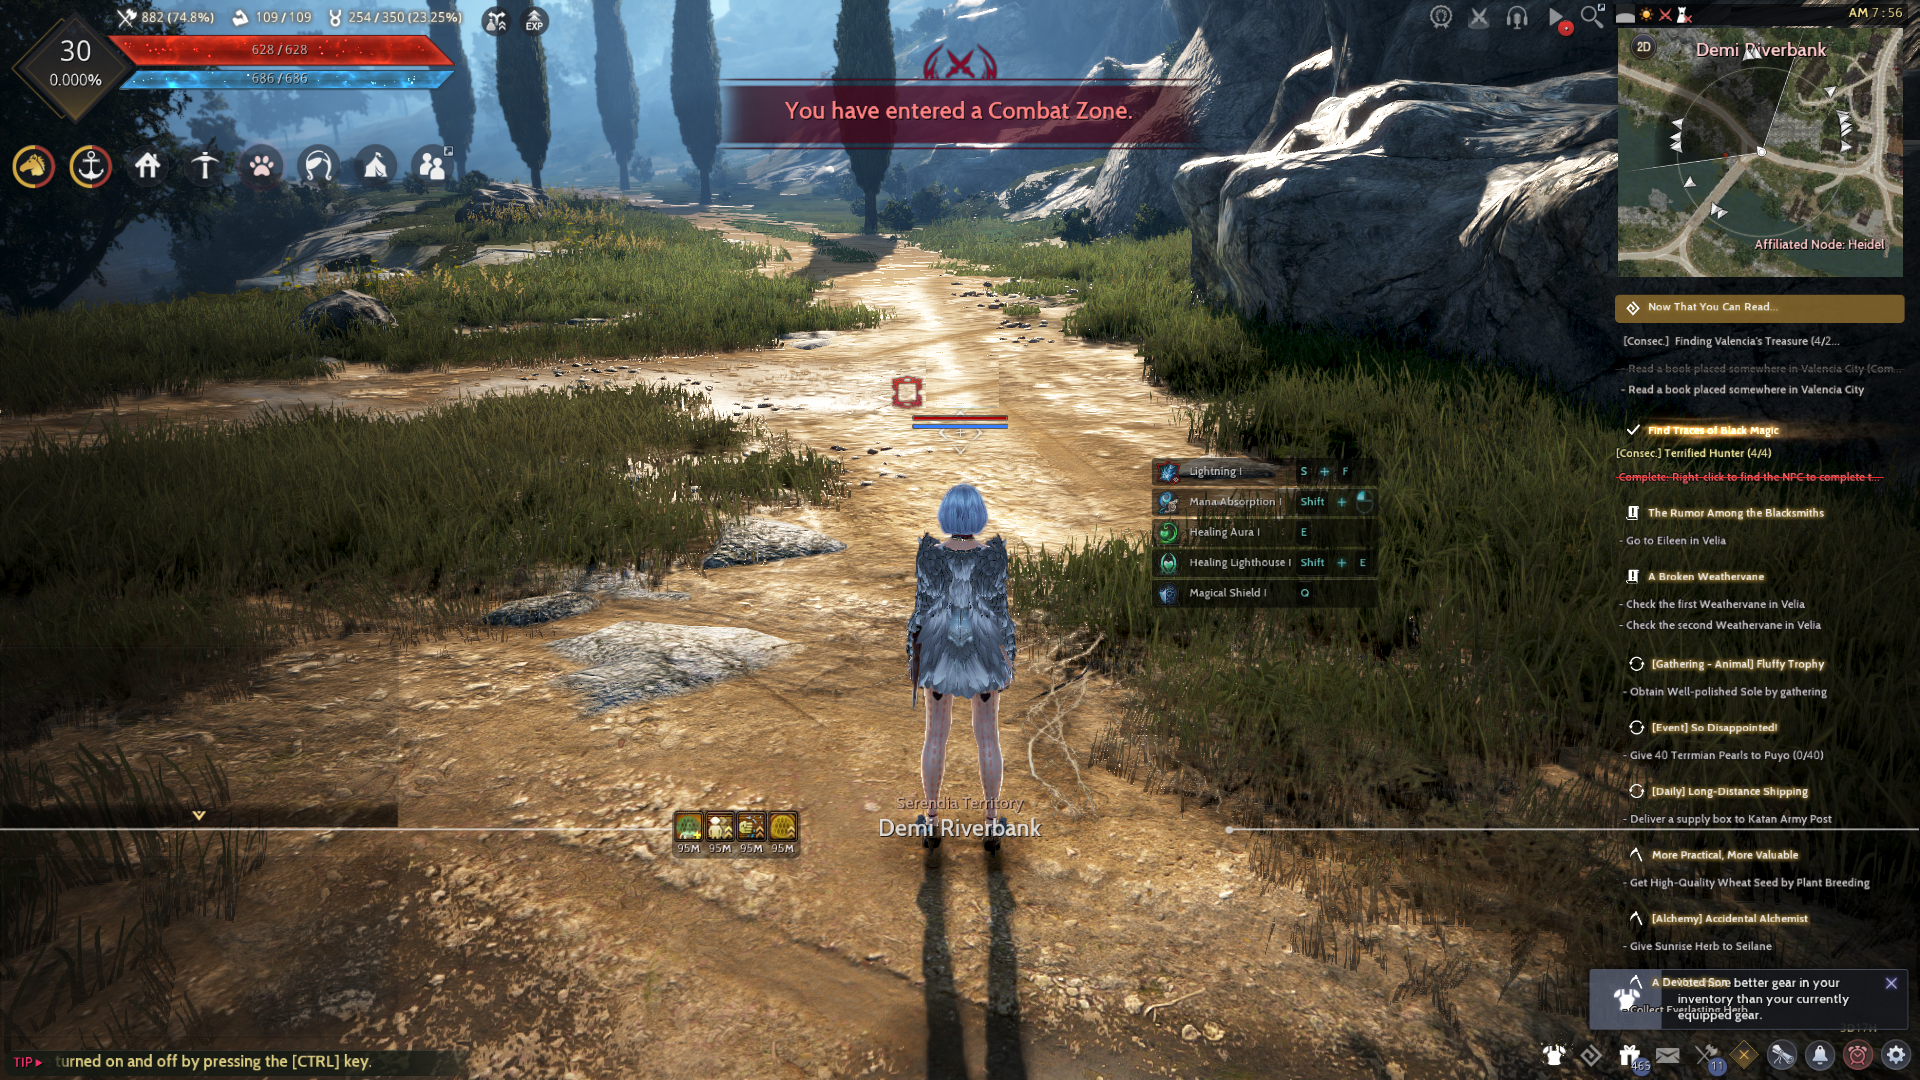
▲ Basic interface screen.
HUD
From top left to right, clockwise, the game's HUD displays the following information:
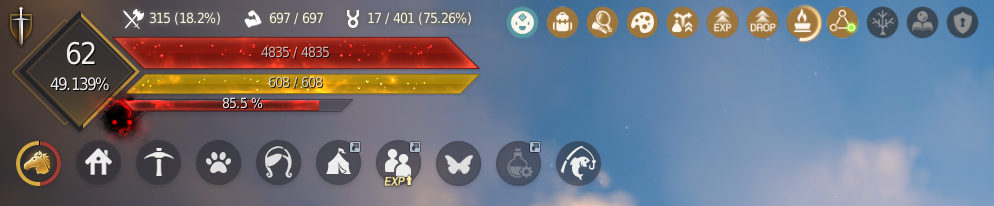
▲ Top left corner.
Here you can find:
- A diamond containing your character's level and its experience progress toward the next level (both in percentage number and as a bar surrounding the rhombus).
- To the left of the diamond, the PvP activation icon, depicted as a sword & shield.
- To the right of the diamond, the HP and class resource (MP, WP, etc.) bars and their numerical values.
- Above these two bars, the icons and values for skill points, character energy, and family contribution points.
- To the right of these icons, a wide variety of icons that display the activation status of certain features and bonuses, such as Value Pack, Kamasylve's Blessing, Secret Book of Old Moon, node investment benefit, EXP boost bonuses, increased drop rate bonuses, the status of your Agris Fever (once unlocked via quests), and others.
- Below the HP and resource bars, in red, the Black Spirit's Rage bar.
- Beneath this bar, a series of icons that represent various features that you might have active, such as a land mount and/or boat being used by your current character, the family's list of residences, workers list, pets, maids & butlers, campiste, tagged characters, fairy, and fishing rod. (Not all icons will be available at the start of the game as some contents need to be unlocked)

▲ Top right corner.
Here useful server information, the minimap, quests, and others are displayed by default:
- The icons to the left of the minimap will show you features such as the Progression Pass for non-season characters, the Old Moon Grand Prix horse racing mode, node installation areas for Node Wars, voice chat status, the game's video guide, and the very useful Find NPC tool.
- Above the minimap you can see the type of terrain you are in, weather, Node War status, Conquest construction status, the server you are in, and the in-game time.
- The minimap, which can be seen in its traditional 2D top down view and in a 3D mode.
- During World Boss encounters, to the left of the minimap you will see the Boss Vision Range toggle, which allows you to increase the maximum vision range to help you with the bigger bosses.
- Below the minimap you will find the quest tracker.

▲ Bottom right corner.
The various notification widgets, as well as other features, are listed here:
- The notification widgets let you access the Black Spirit's Safe where daily login and Black Spirit's Adventure rewards are stored, your list of open Dark Rifts, an icon to access the Black Spirit interface, and the Challenges reward window, the Main feature, your character's skills window, and the list of available targets across the world for the hunting Life Skill.
- To the right of these widgets you can access the quest window, Central Market notifications, the Pearl Shop interface, and the game's settings.

▲ Bottom middle section.
The bottom middle section of your screen will show the default action hotkeys, and active buffs and debuffs affecting your character.

▲ Bottom left corner.
This section of the HUD is by default reserved for the chat windows.
Edit UI - Interface Edit Mode
Accessed via the main menu, the Edit UI tool will let you customize the position and visibility of the elements that make up the HUD.
- New Main Menu (Hotkey: Esc)

- Old Main Menu (Hotkey: Esc)

▲ From the menu, click Edit UI to start the Interface Edit Mode.

▲ The screen can appear chaotic at a glance, but you will see every section tells you what is displayed in it.
- In white, currently visible sections that can be made invisible and moved.
- In transparent black, currently invisible sections that can be made visible and moved.
- In red, sections that can be made visible or invisible, but that cannot be moved.

In this mode, by clicking on the eye symbol in each window you can turn them on and off, making them visible or invisible.
You can set up your customized interface with various functions, such as saving your changes and establishing presets, as well as selecting a combat focused preset that you can then alter further and save.

If you check "Show Grid" in the Interface Edit Mode, grid lines will be displayed on the whole edit screen, so you can create your own interface environment in a more sophisticated manner.
The Auto-align Slot option will help you place 20 separate quick slots more conveniently.
If you move a quick slot near a quick slot you have already arranged, it will be placed at the same interval to the adjacent slot.
When saving a set interface, you can save it in a preset so that it can be recalled for later use.
If you want to reapply the settings stored in a preset, you must first reset the interface then proceed with loading the chosen preset.

If you do not want to use a preset, you can simply save the current changes to clicking on Save (ENTER). Keep in mind all the available options in case they prove to be useful to you down the line.
Sticker UI
The Sticker UI is a feature that allows you to move in-game windows outside of the game so that you can make better use of your screen. You can use this feature only with some in-game windows, not all of them.
Click on the Sticker UI button in the top right corner of the window to enable it. The moment you click on it, the window disappears in the game and an exact copy of it appears in its place. The window is at the very front of the screen and you can move it freely outside of the game.

▲ How to enable Sticker UI.
You can move the window by left clicking on its title bar and dragging it.
As said before, it is possible to move these windows outside the game.
The Sticker UI window will be visible as long as the game is not minimized or closed. It will darken if you open another window in-game which would normally not allow you to use it.
e.g. You have the Quest window (hotkey: O) open using the Sticker UI. When you open the World Map (hotkey: M) in-game, the Quest window will darken, and you will not be able to do anything to it. This is normal so do not worry when this happens.
However, keep in mind that you cannot use all the features on the selected window while using the Sticker UI feature.
To close a Sticker UI window, you can either click on the Sticker UI button to return it to the game, or you can click on the "X" button.
Additionally, they will automatically close if you change servers or revive.

▲ You can move the Sticker UI window outside the game.
Here are the windows that allow the use of the Sticker UI feature:
My Information, Inventory, Equipment, Worker List, Trade Info, Quests, Adventurer's Board, Black Spirit's Adventure, Crafting Notes, Barter Information, and Guild.
* The content of the game guide may differ from the actual game content, depending on the update and content changes.