World Bosses
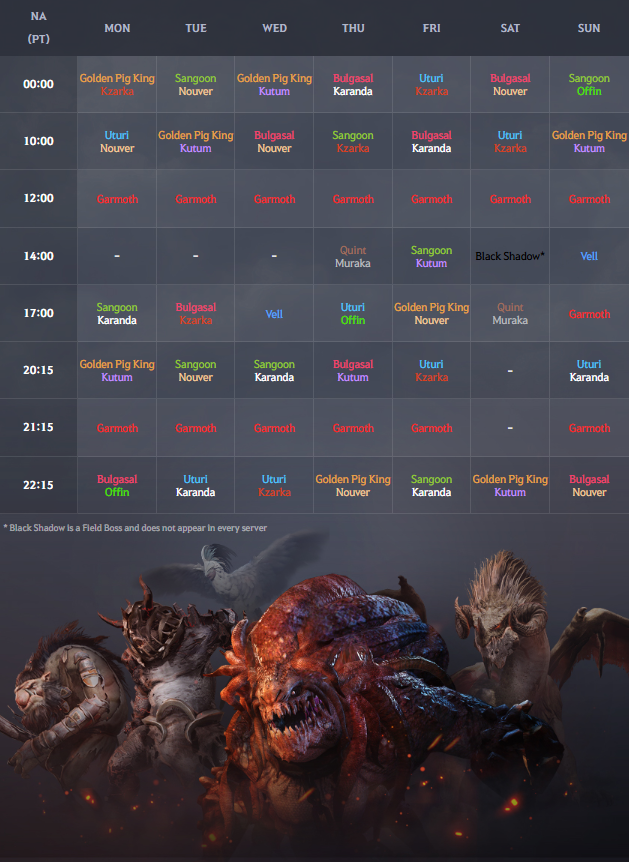
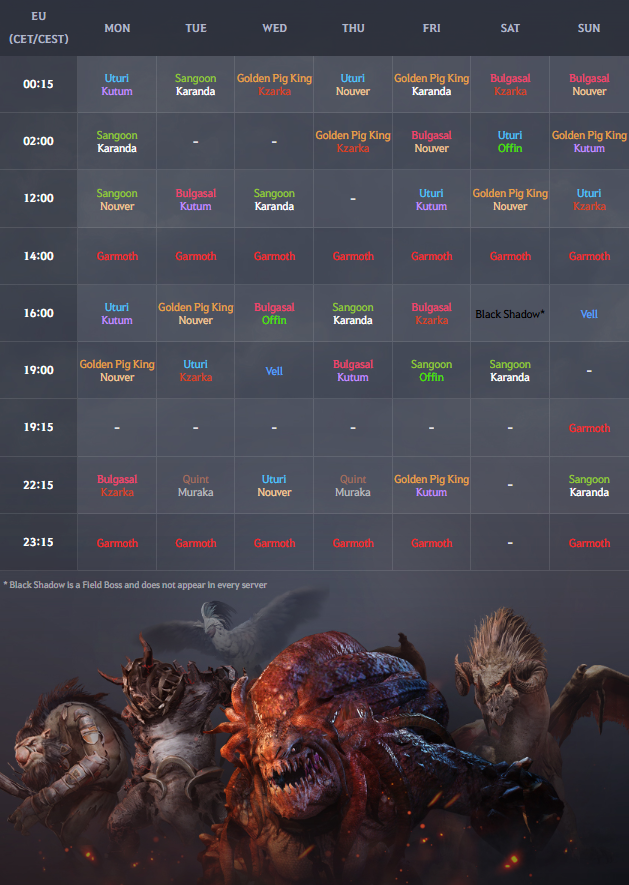
Schedule for When World Bosses Appear (In Black Desert's World)
NA
EU
World Boss Appearance Notification

▲ System messages announcing the appearance of the various World Bosses will appear at the top of your screen.
World Bosses appear in specific locations, so anyone can join the fight. However, it is best to get your AP and DP high enough for you to have a chance to earn loot as well as withstand their attacks.
When a World Boss is defeated, many Adventurers are chosen to pick-up loot depending on the "amount of damage dealt". Still, there is no reason to stress too much about getting good gear. The "amount of damage dealt" is only one of the standards, so you can still have a chance to get the best loot items if you are lucky.
World Bosses will automatically vanish if you do not defeat them within 30 minutes. (For Quint/Muraka it is 15 minutes.)
You can partake in the World Boss Raids on almost any server, since the World Bosses share HP across all servers.
You will not lose EXP and your crystals will not break even if your character dies during the encounters.
You can set up a notification to remind you when World Bosses are about to appear. Go to the main menu (Esc) > Adventure (F5) > Boss Notification.

You can set up the notification to appear 5, 15 or 30 minutes before the boss spawns.
Kzarka

Kzarka, the Lord of Corruption, is relatively one of the easier world bosses to defeat.
When Kzarka becomes immune to all attacks, it means it is preparing to unleash its fiery breath or a large area of effect (AoE) attack. When this happens, you must hide behind a column to minimize the amount of damage dealt.
If it is your first time, you should carefully observe the movement of other Adventurers. When other Adventurers step back, you should follow their movements to evade Kzarka's powerful attack pattern.
You have a chance of obtaining a Kzarka's Sealed Weapon Box as loot after he is defeated. Should you obtain it, right-click on the weapon box to get a Kzarka main weapon for your class.

◈ Nightmarish Kzarka
 ▲ Nightmarish Kzarka appears as it deals AoE damage
|
 ▲ Kzarka opening up a series of attacks and AoE damage as a pattern
|
 ▲ Roaring, and attacking with black breath
|
 ▲ An attack pattern in which nearby targets are pulled and dealt with a powerful blow
|
 ▲ Tentacle Summoning attack patterns (You will receive a movement speed/attack speed debuff upon hit)
|
 ▲ A beserk pattern that brings down chaos
|
When Kzarka is scheduled to appear, "Nightmarish Kzarka" may appear instead.
You should be well-prepared for battle to survive Nightmarish Kzarka's sudden appearance.
You can easily be defeated by Nightmarish Kzarka, as he is much more powerful than the pre-existing world boss and has a variety of attack patterns.
The benefit to fighting his Nightmarish form is that you can obtain much more valuable loot, including a Kzarka Weapon Box containing Kzarka main weapons that are enhanced up to TET (IV).
* You must inflict a minimum of 0.01% damage to Nightmarish Kzarka's total HP (which is shared across all servers) to qualify to obtain loot.
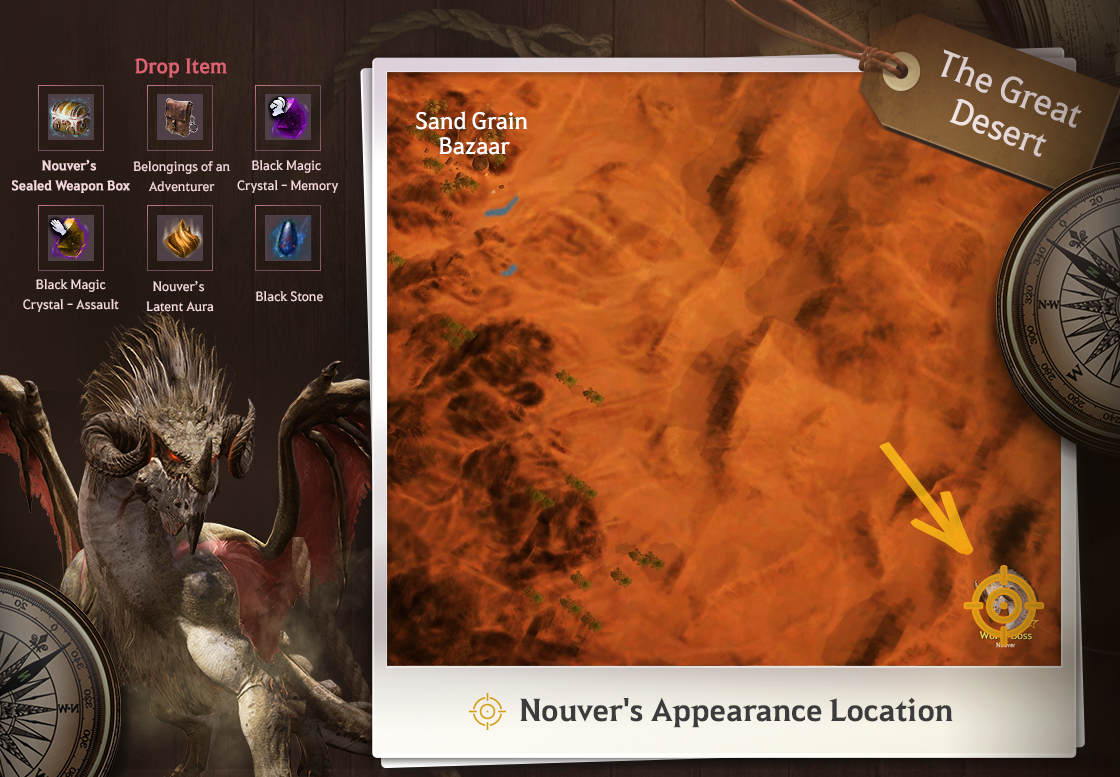
Nouver

You will need Purified Water and Star Anise Tea to fight off desert illnesses since Nouver appears in the desert.
During the encounter, you should be ready to quickly move away from Nouver to avoid getting sucked into his whirlwinds. Also, remember to evade to the side when he tilts its head back, signaling that it is preparing to use his fire breath. This attack deals high damage to any target caught in its path.
Nouver also uses powerful skills while airborne, so be prepared to use invincibility, evasion, and blocking skills to survive the powerful boss' attacks. Move away from other Adventurers to prepare for an AoE attack when Nouver is airborne.
You can obtain a Nouver's Sealed Sub-weapon Box if you are lucky. Right-click Nouver's Sealed Sub-weapon Box to obtain a Nouver sub-weapon for your class.
◈ Bloodstorm Nouver
 ▲ Appears with a powerful storm
|
 ▲ Fires two fire breathes right after each other
|
 ▲ Creates a phantom using the sandstorm
|
 ▲ Cries out and summons a huge whirlwind
|
 ▲ 3 stage attack from the air
|
 ▲ Slams down on the ground to bring utter destruction in the area
|
When Nouver is scheduled to appear, "Bloodstorm Nouver" may appear instead.
You should take precautions when encountering this boss, as it is much more powerful than the regular Nouver, with new attack patterns such as creating AoE whirlwinds and illusions.
When you defeat Bloodstorm Nouver you can obtain much more valuable loot, including a sub-weapon box containing Nouver sub-weapons enhanced up to TET (IV).
Also, there is a chance to obtain two special items, "Bloodstorm Nouver’s Ragged Wing" and "Bloodstorm Nouver’s Split Horn", both are used to craft a special outfit with the appearance of Nouver.

➤ Visit [Special Outfits] page to know more details on how to craft the Nouverikant outfit.
* You must inflict a minimum of 0.01% damage to Bloodstorm Nouver's total HP (which is shared across all servers) to qualify to obtain loot.
Karanda

You can only encounter Karanda in Karanda Ridge, in Calpheon. This World Boss alone is quite strong and has a variety of attack patterns. Additionally, the terrain roughness and limited space of the ridge makes the encounter against the Harpy Queen even more perilous.
There are two skills to take note of: The first skill is an AoE attack in which she suddenly flies up into the sky and attacks a large area outside of the circle around her. To avoid this attack, you must quickly get within her circle. The second skill is an attack pattern in which she lands for a short moment then takes off again. This AoE attack deals damage within the circle around her, so it is important to quickly move outside the circle to avoid it.
You can obtain a Dandelion Weapon Box if you are lucky. Right-click the weapon box to obtain a Dandelion Awakening weapon for your class.

◈ Stormbringer Karanda
When Karanda is scheduled to appear, "Stormbringer Karanda" may appear instead.
You have to brace yourself for the powerful whirlwinds she creates upon appearing.
You must be especially careful, since the enhanced attack pattern of this World Boss lets her throw you into the distance far below the mountains, which may deal high, if not fatal, damage.
 ▲ Stormbringer Karanda Arrival
|
 ▲ Enhanced Feather Attacks
|
 ▲ Attacks that summon powerful gusts of wind from the rear
|
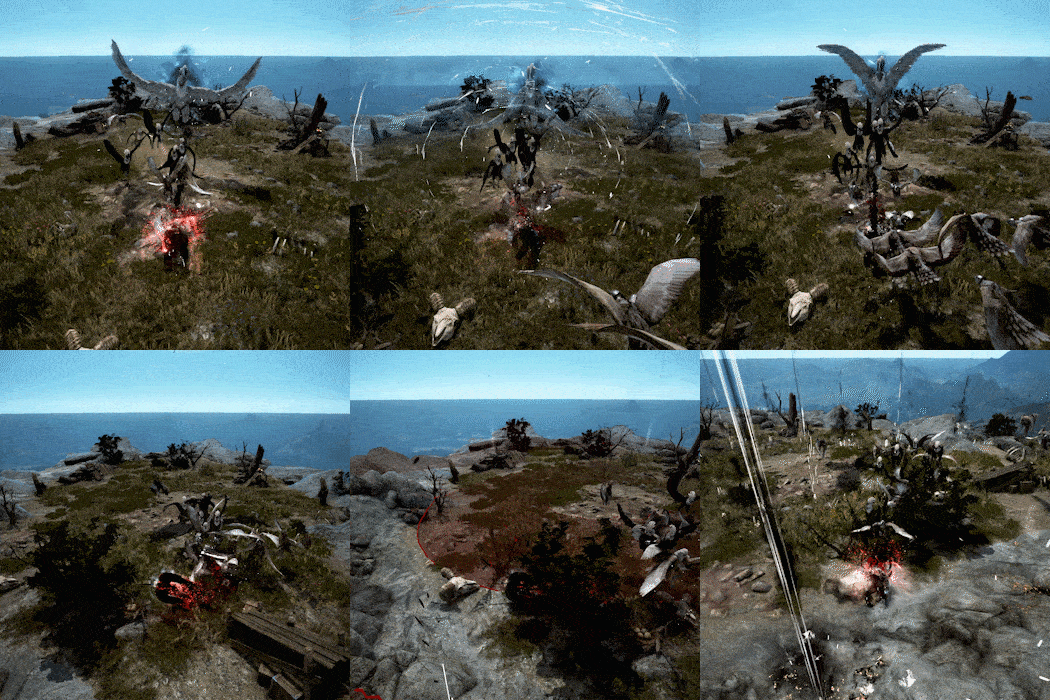 ▲ Boss patterns that can afflict devastating random damages by summoning countless harpies
|
 ▲ Boss pattern that pushes back anything within the vicinity of Karanda along with a sweeping attack on the outer line
|
 ▲ Calls upon a powerful storm using the power of harpies
|
When you defeat Stormbringer Karanda, you can obtain much more valuable loot, including the "Heart of Karanda", which when infused to an Awakening weapon adds the effect Critical Hit Rate +3% and a crystal slot to it, and a weapon box containing a Dandelion Awakening Weapon that is enhanced up to TET (IV).

* You must inflict a minimum of 0.01% damage to Stormbringer Karanda's total HP (which is shared across all servers) to qualify to obtain loot.
Kutum

Kutum takes the form of a worm and moves its body from side to side when it attacks. It also has powerful skill effects that allow it to suck in everything in range.
It makes a ranged attack that spits out dirt to stun its targets, and it also jumps at a particular target after it digs into the ground.
You should always be careful, since the boss sends out electric currents once its HP reaches 50% or below.
Make sure to avoid the storm of dust that forms when it emerges from the ground.
You can obtain a Kutum's Sealed Sub-weapon Box if you are lucky. Right-click the Kutum Sub-weapon Box to obtain a Kutum sub-weapon for your class.
Kutum sub-weapons are popular amongst Adventurers as they balance both AP and DP, whereas Nouver sub-weapons focus more on AP.
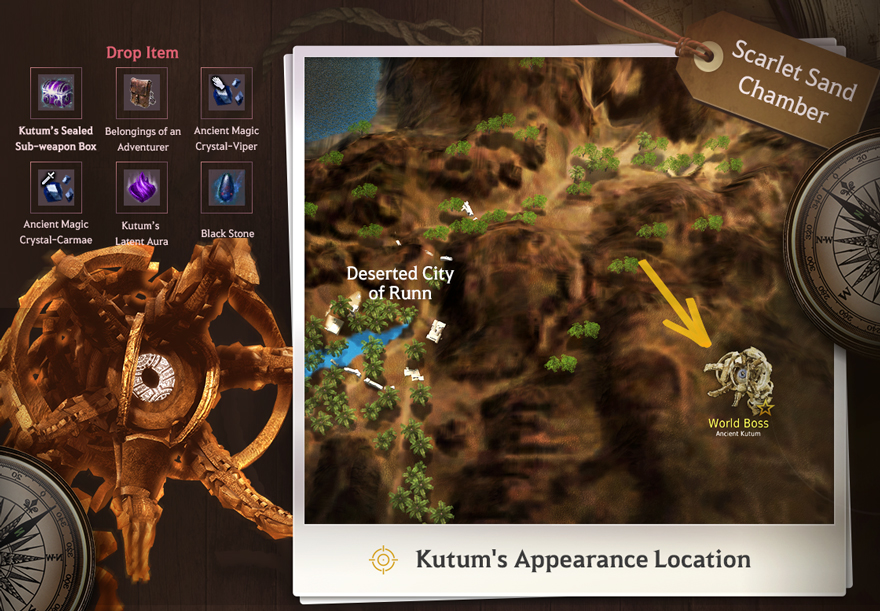
◈ Thundercloud Kutum
When Kutum is scheduled to appear, "Thundercloud Kutum" may appear instead. It has powerful skills and employs a wide variety of attack patterns, and in addition, creates thunder clouds during the encounter. Consider these clouds a puzzle. If you are affected by them, you will notice a debuff that gradually drains your HP. To a side of the room you will find two stone chambers. Simply enter the stone chamber that is of the same color as the clouds to clear them away.
Be wary of Thundercloud Kutum once its HP drops below a certain amount, as it will start to use powerful skills, like summoning ancient weapons.
 ▲ Thundercloud Kutum appears
|
 ▲ Kutum raining down multiple thunderbolts in its
|
 ▲ Kutum attacking with electrical storms
|
 ▲ Kutum attacking by rising from the ground
|
 ▲ Kutum summoning Ancient Weapons
|
 ▲ Kutum summoning an electric orb that moves randomly
|
 ▲ Kutum sucking in all things in its vicinity
|
 ▲ Kutum dealing a frontal swipe attack, and then attacking the opposite direction
|
When you defeat Thundercloud Kutum, you can obtain "Kutum's Power Stone", which is equipped in the Alchemy Stone slot. It enables you to deal damage to monsters and debuff DP of your enemies, but keep in mind that this power stone cannot be recharged.
You can also obtain much more valuable loot, including the "Heart of Kutum". which when infused into a sub-weapon adds the effect Special Attack Evasion Rate +7%, and a weapon box containing a Kutum sub-weapon that is enhanced up to TET(IV).
* You must inflict a minimum of 0.01% damage to Thunderstorm Kutum's total HP (which is shared across all servers) to qualify to obtain loot.
Quint

▲ Quint is bigger than a regular troll.
You can see a giant troll statue when you go to Quint Hill in Northern Calpheon. This is Quint, also known as the first troll.
When a system message appears, Quint will start jumping all over the place as he escapes his petrificated form.
Quint is relatively slow, which means it is possible to evade its attacks if you really focus on the fight. However, do not rely too much on HP potions, and take a direct hit from him if you want to survive the encounter.
Quint's attack speed and AP increases as his HP decreases, so be sure to keep your focus throughout the fight.
Item Drops: ★ Quint Statue, Belongings of an Adventurer, Black Magic Crystal - Hystria, Black Magic Crystal - Harpia, Mutant Enhancer, Gold Bar 100G, Gold Bar 10G, and more.
- Top 70% Contributors to the fight can earn 1-5 Chilling Fragments according to a set probability.
- Top 100% Contributors to the fight can earn 1-2 Chilling Fragments according to a set probability.
(When obtaining 100 of these items you can exchange them for a Deboreka accessory)
◈ Location of Quint

▲ Quint Hill, Northern Calpheon
Muraka

▲ The King of Ogres, Muraka is covered with black crystallized scales. He is bigger than a regular ogre.
Muraka, a giant ogre, is covered with black crystallized scales. He is bigger than a regular ogre.
The threatening presence Muraka gives off has earned him the title King of Ogres. Muraka appears deep within the Mansha Forest, where the Mansha goblin tribe and other ogres reside, but do not make the mistake of equating them to him.
Muraka is slow like Quint and relatively easy to dodge. However, do not underestimate the powerful AoE attacks of Muraka, or else you will drop flat on the cold, forest floor.
Keep in mind that as Muraka's HP drops, his attack speed and AP increases. Once his HP gets low, your character can be killed instantly when Muraka uses the attack where he strikes the ground with his fist, even if you have a set of TET (IV) defense gear.
So, why not go for the challenge? You can deal damage to make Muraka fall on its knees by continuously attacking its legs, since it is gigantic like Quint
Item Drops: ★ Dim Ogre Ring, Mutant Enhancer, and more.
- Top 70% Contributors to the fight can earn 1-5 Chilling Fragments according to a set probability.
- Top 100% Contributors to the fight can earn 1-2 Chilling Fragments according to a set probability.
(When obtaining 100 of these items you can exchange them for a Deboreka accessory)
◈ Location of Muraka

Mirumok Destroyer Offin

Mirumok Destroyer Offin appears deep in the Holo Forest of Kamasylvia. You will need to be well-prepared to fight this world boss, as it is one of the toughest ones to defeat.
Offin is a world boss that repeatedly transforms and combines. The large, tree-like entity is the Mirumok Destroyer Offin, and the one riding it from within is Watcher Offin Tett. Offin has four legs and a gigantic body, whereas Offin Tett is mounted and resides within. You can only attack Offin's legs at the start of the encounter.
Offin Tett will come out for the first time once a certain amount of damage is dealt to Offin's legs. Offin stops functioning once Offin Tett comes out, but it doesn't mean the fight gets any easier. Offin Tett creates multiple clones and uses powerful attacks, so do not let your guard down.
When Offin Tett loses a certain amount of HP, it gets back inside Offin to continue the fight.
When you defeat Offin, you can obtain Offin Tett's Light Sealed Weapon Box if you are lucky. You can get an Offin Tett's Radiant main weapon for your class when you open the box.
Offin Tett's Radiant weapons have lower accuracy, but higher AP compared to Kzarka main weapons.

Garmoth

The Crimson Dragon, Garmoth, appears at Garmoth's Nest in central Drieghan.
She is much more powerful than the iteration you defeat as part of the Drieghan main questline, so it is a good idea to be well-prepared before taking on this challenge.
Garmoth is a dragon just like Nouver, but the main difference between the two is Garmoth's AoE attacks. Watch out for the Crimson Dragon's AoE attacks, as depending on the amount of magic she has absorbed, they may prove fatal should you approach them without enough preparation.
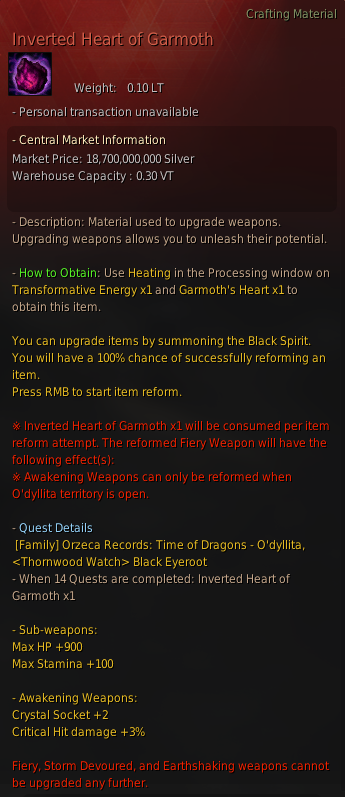
When you defeat Garmoth, you can obtain "Garmoth's Heart" if you are lucky. Garmoth's Heart, like the Heart of Karanda, is used to upgrade certain weapons. In this case, not only Awakening weapons, but also Kutum and Nouver sub-weapons can be upgraded with it.
Upgraded Awakening weapons will receive 2 magic crystal slots and the Critical Hit Damage +3% effect, while upgraded sub-weapons will receive the following effects: Max HP +150, Max Stamina +100, and Special Attack Evasion Rate +10%.
However, to upgrade weapons with Garmoth's Heart you will first need to transform it into an "Inverted Heart of Garmoth" via a quest.
Also, there is a small chance to obtain "Garmoth's Horn". With this item, you will be able to obtain a dragon pet with the appearance of Garmoth, with the "Max HP +25" special talent.
Keep in mind that this pet can only be upgraded with another of the same type, and Wizard Gosphy won't work with them.
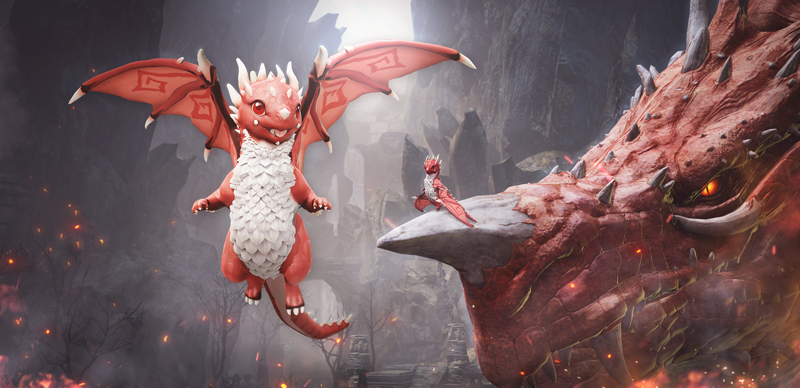
- Garmoth's loot is not received directly into your inventory. Click the "Receive Reward" button that appears on your UI, near your minimap, to receive the loot.
- You can obtain Garmoth's loot 3 times per week, and the weekly quest resets every Thursday at midnight (00:00 UTC).

Vell

▲ Vell, the Heart of the Ocean, appears deep within Margoria, in the appropriately called Vell's Realm area.
While the system will notify you of other World Bosses appearing 15 minutes before it happens, you will see a system message on the screen that lets you know when Vell will appear 30 minutes in advance. This is due to the long distance that needs to be traveled to reach the area.
At the start, a whirlpool will form before Vell's appearance. If you get swept into the whirlpool, you and your ship can take tons of damage. Also make sure to approach Vell carefully, since it can deal a lot of damage to Adventurers in the area when it first appears, enraged and attempting to escape from the seal trapping it.
When the fight begins, Vell uses her fragments, "Lopters", and tries to destroy ships that fire cannons at her. The approaching Lopters can be defeated by firing hunting matchlocks.
Vell can only take damage from ship cannon fire. Vell retaliates from time to time with powerful breath attacks, so be sure to stay on the move if you are in the breath's path.
When you fight Vell, every member of the same party or platoon is granted the same amount of Combat EXP, even when another member uses the Focus Fire skill.
Everyone should just try their best in each of their positions, whether you are an Adventurer steering the ship, defeating incoming Lopters, repairing the ship, out scouting, or firing cannons.
If you choose to resurrect at the closest town, you will resurrect at Oquilla's Eye.
If you choose to resurrect at a node, you will resurrect on the ocean (at a slight distance away from the area where the fight against Vell takes place). When you resurrect at the node, wait for other Adventurers to come rescue you, as there are buoys nearby.
Once Vell takes a certain amount of damage, it will enrage and unleash a devastating AoE attack. When this happens, every Adventurer on the surface of the water will die from a big tsunami. You can avoid the incoming wave by either firmly holding onto the ship or diving underwater.
You can obtain your reward for defeating Vell through the Black Spirit's Safe. When you defeat Vell, you can obtain "Vell's Heart" if you are lucky, a rechargeable offensive alchemy stone. If you obtain Vell's Concentrated Magic, you can process it via Simple Alchemy with x1,500 Alchemy Stone Shards to obtain a Vell's Heart.

Land of the Morning Light
You can encounter some of the Collection of Tales & Black Shrine bosses of both the Donghae and Hwanghae provinces as world bosses.
In the Land of the Morning Light, you can earn boss loot up to once per week for each of the four world bosses. Defeat each world boss and claim your rewards through the Region Quest UI in the top right of your screen.
- Each boss region quest is a weekly quest, resetting every Thursday at midnight (00:00 UTC).
- The four types of bosses in the Land of the Morning Light appear 11 to 12 times each week. You only need to defeat one of each type to receive all the rewards for that week.
- Even if you have not completed the Morning Light main questline, you can still acquire the boss loot from the Region Quest UI.

◈ Golden Pig King

◈ Sangoon

◈ Bulgasal


* The content of the game guide may differ from the actual game content, depending on the update and content changes.


